

Contents:
Virtual Composer is a virtual music editor, compiler and QuickTime Musical Instruments executor designed to execute perfectly time-wise complex polyphonic music using QuickTime's Musical Architecture. Its emphasis lies on manipulating a musical score in ways similar to a how human performer would execute a real score in an real instrument.
Being an amateur pianist, I wrote this program to help me understand more how my piano pieces should sound, but have added several useful facilities to aid the professional musician/composer as well.
If you are simply looking for a simple way to turn your musical doodles into printable notation, this program is not for you. Buy another program.
The latest version of this program can always be downloaded from here.
To run Virtual Composer you need:
Virtual Composer needs the extensions QuickTime and QuickTime Musical Instruments. It also needs certain other components in order to be able to export as AIFF and MIDI, which in earlier versions were part of the basic QuickTime set but later were moved into other extensions. If you have a fast Macintosh, you can install QuickTime 6.x/7.x, but I found that version 5.0.1 fails miserably on my slower, Performa 5200CD, 75Mhz PowerMac because I use RamDoubler. (See section Known Bugs) You may want to stay with QuickTime 4.1.2 if you have a slower Macintosh with a clock speed of less than 200-250Mhz or not enough memory. If you have a 68k Macintosh, install QuickTime 4.0.3, which is the latest version that runs on 68k Macintoshes. You DON'T need the Pro version, but if you have it, you can do some serious music hacking on those exported MIDI files. (see Phil Taylor's Hack For Musicians below).
To summarize:
Virtual Composer needs at least the following components when you install, in order to function reliably, listed in order of importance:
The included Virtual Composer files are by:
Virtual Composer, ©Ioannis Galidakis, 1999-2021, all rights reserved.
THE AUTHOR OF THIS SOFTWARE, DISCLAIMS ALL WARRANTIES WITH REGARD TO THIS SOFTWARE, INCLUDING ALL IMPLIED WARRANTIES OF MERCHANTABILITY AND FITNESS. IN NO EVENT SHALL THE AUTHOR BE LIABLE FOR ANY SPECIAL, INDIRECT OR CONSEQUENTIAL DAMAGES OR ANY DAMAGES WHATSOEVER RESULTING FROM LOSS OF USE, DATA OR PROFITS, WHETHER IN AN ACTION OF CONTRACT, NEGLIGENCE OR OTHER TORTUOUS ACTION, ARISING OUT OF OR IN CONNECTION WITH THE USE OR PERFORMANCE OF THIS SOFTWARE.
ALL RIGHTS OF THE CORRESPONDING COMPOSERS, PRODUCERS, ARRANGERS, MIXERS, SOUND EFFECTS SPECIALISTS AND OWNERS OF THE WORKS REPRODUCED AND CONTAINED HEREIN, RESERVED WORLDWIDE. UNAUTHORIZED COPYING, HIRING, LENDING PUBLIC PERFORMANCE AND BROADCASTING OF THESE WORKS PROHIBITED. WHERE APPLICABLE, OBTAIN PERMISSION FROM THE OWNERS OF THE ABOVE WORKS.
Extended macro definition file "Bach Ornaments", courtesy and © Phil Taylor.
All scores of the "E-motion (part one) suite" project are © by Childe Roland of Aeon Music Productions and may not be modified or distributed without the explicit consent of the author.
"Prelude and Fugue" project and "Fugue for Prelude BWV 999" are © by Ioannis Galidakis and may not be modified or distributed without the explicit consent of the author.
"Immer wieder kehrst du Melancholie..." and "Yaaph" are © by Jean-Christophe Levinson and may not be modified or distributed without the explicit consent of the author.
Macintosh, Finder and QuickTime are © and registered trademarks of Apple Computer, Inc.
Petrucci font © by Coda Music, used with permission.
Other names and software © of their respective owners as applicable.
Converting Files Created with
Older Versions
If you have already registered Virtual Composer and you have created files with
versions of Virtual Composer prior to 2.9.5 use the enclosed utility "Convert VCFile
2.7->2.9.5" to convert your files into the newer Virtual Composer format. If you
have created files with versions between 2.5 and 2.6.8 use the enclosed utility
"Convert VCFile 2.5-2.7" to convert your files to the newer 2.7 format. You don't need
to convert the example files. Only your own files.
NOTE: As of release (2.9.5) the file format has changed. Use the enclosed
converter to convert your files to 2.9.5.
If the converter fails to properly convert your document to version 2.9.5, try opening
your document with Virtual Composer version 2.9.4, SaveAs a separate file, and try to
convert that via the "Convert VCFile 2.7->2.9.5". If despite all your efforts the
document still fails to be converted properly, email
me the UNCONVERTED document and I will try to convert it for you.
Virtual Composer was a USD 25 shareware. If you liked it you were expected to register it. The unregistered version is identical to the full version and fully functional, except that it cannot save files in its internal format. Otherwise the program is fully functional and you can edit and play to your heart's content. If you want to register Virtual Composer:
Send a check for the equivalent amount of $10 payable to me (Ioannis Galidakis), an International Post-Office Money Order for the same amount payable to me or the equivalent of this amount in CASH in your local currency wrapped inside Carbon paper inside a regular postal letter to my address:
Ioannis Galidakis
Zaimi 34,
P. Faliro, 17562.
Athens, Greece.
email
If you reside inside the European Union Euros are preferred. Otherwise send whatever currency your country uses.
Alternatively you could donate a small amount through Paypal, here, if you desire to use a credit card.
The program is now discontinued, so I am giving it away as freeware. If any of the available versions in the download section works on your machine, email me so I can send you a registration number, to activate the saving function.
After you acquire the registration number, select "Apple->Register...", input this number on the "Registration Number:" field, input anything you want on the "Registration Name:" field and click "Register".
For site licensing information contact me through email.
If you are a managing editor for a Macintosh magazine or an online distributor of software, you have my permission to distribute the entire Virtual Composer package exactly as it is when you download it from Virtual Composer's home page. You are NOT allowed to modify the package in any way and for every online distribution or magazine in which Virtual Composer gets distributed, you are expected to send me a quick email to tell me about it and for every magazine in which you include it, you are expected to send me a complimentary copy via snail mail at my home address (see Registration) of the specific issue in which Virtual Composer gets published.
Virtual Composer is a "linear" multichannel editor. What this means, is that edited
channels run in parallel.
Allowing a single channel to accept more than one note at a time, is allowed by using
chords but it is discouraged.
The "Linear" behavior is consistent when you create MIDI files which have a specific
number of channels, such as 8, or 13, and you are sure that the final executable will
contain EXACTLY as many channels as the Virtual Composer document.
Before you enter a document's symbols you need to do one thing: First find out how many
Logical Pages you will need, which is easy: Count the bars in your actual score, divide
by 16 and add 1. The resulting number will be the number of Logical Pages.
Then you need to divide your score into voices and this is slightly more complicated.
With multi voice pieces such as explicit 2, 3, 4 or more voices where the composer
wrote them explicitly as such it is easy because the indications are already there by
the composer or the edition you are using. With cheaper editions however or with
simpler melodies the voices may not be immediately visible. You need thus to logically
divide the notes of the score into voices and decide which symbols go into which voice
d which symbols are going to be "incidentals". Usually the upper melody is voice 1 so
you can input it in Virtual Composer as channel 1. Then for every lower voice place
every note in channel number n starting with channel 2 and going onto lower channels
until you exhaust all the notes. If your score shows "incidental" notes (which are
notes which do not have explicit voices associated with them) place them inside chords
in already existing channels. (See also section on Chord Notes). To activate a page for editing, select the
Selection Cursor and click inside a page once. Since only one active Logical Page can
be edited at any time, all editing operations apply only to the Logical Page you are
editing. In particular, you cannot select a range that crosses Logical Page boundaries.
Neither can you tie notes if the tie crosses Logical Page boundaries. Cutting, copying,
pasting and deleting of note ranges takes place only within the edited Logical Page.
Thus if you leave "gaps" in a channel between Logical Pages the music will
desynchronize since the program's parser parses symbols by ignoring gaps. To avoid
"gaps" and to avoid missing accidentals, it is recommended that you select the command:
"Play->Check Syntax" after you input your score, which will show you if there
are any offending places. (See section Checking For Syntax
Errors below). Editing operations are enabled only if the edited page is "In View".
That is if at least some part of the edited page is visible. If you move onto another
page where the original edited page is out of view all editing operations will become
disabled. All editing operations also will become disabled if you select
"Channel->Edit->None/Show All" or if you disable a channel through
"Channel->Activate n".
There are two ways to create chords. You can create chords that run between channels
or you can create chords within the same channel. Here's an example on how to create a
simple chord inside the same channel:
Here's an example on how to create a simple chord that runs between different
channels:

While you can create chords using either of the methods above, beware that if you apply any global controllers to a channel that contains chords, only the chord symbols belonging to that channel will be affected. So, in effect, stereo chords can only be created using the split-channel method above. Also, allowing chords inside a single channel ups the memory requirements of the program tremendously. So don't use single-channel chords unless it's really necessary. If you MUST use single channel chords, count the maximum number of simultaneous symbols in your music and enter this number in the "Max Chord Notes" field, to minimize the memory requirements for the new document. In other words, if your musical score does not contain chords with more than 2 simultaneous notes, don't input a number greater than 2 in the "Max Chord Notes" field.
You can tie consecutive notes or chords, but now that Virtual Composer allows single channel chords, there are some cases which may be indeed quite strange. Consider for example the following:
In the above example, the chord heads (E) are all tied. The first three incidental notes (C) are again all tied and the only "free" incidentals are the chord bottom notes, except for the last chord, where both incidental notes are free. In addition to all this, all chord heads have non-trivial ornaments. So what is the program supposed to do in this case?
The answer is basically dictated by the ornamentation. Since non-trivial ornaments exist on top of the tied notes, the ties on the chord heads are essentially ignored, whereas the ties on the C's are not. Such cases are indicative of the wild possibilities that can exist in Virtual Composer, but if you can avoid them, so much the better. The above case for example, could not possibly get converted effectively into abc.
Note also that a "tie" in Virtual Composer, denotes the explicit "lengthening" of a note's duration, whether because the tied TO note belongs to a different bar or for other reasons. You should not confuse a "tie" with a "slur". Virtual Composer supports only regular ties and not slurs. While ties can exist only between CONSECUTIVE symbols, slurs are an entirely different beast, and as such are not implemented in Virtual Composer.
Ties are allowed ONLY between notes of the same pitch or rests. However, it is conceivable that the user ties two consecutive notes and then "shifts" either member of a tied pair up and or down some. In such a case, Virtual Composer will pick up the LAST note and play that, ignoring the first note. Be careful not to create such situations.
If you wish to tie chords, all chord incidentals have to be of the same order in both chords. That is: In order for the second chord note of the first chord to tie to the second chord note of the second chord, they have to have the same "order". Order is determined by how you add chord notes below a chord head. If for example you start with two chord heads C, and add one E above the first chord head and one A below the second chord head, those notes have order 2. Now if you go and add an A below the first chord head and an E above the second chord head, if you try to tie these, the corresponding to be tied chord notes will not have the same order, so only the chord heads will be tied.
Thus, if you wish to properly tie two chords, you should first add the chord heads and then add correspondingly the incidental chord notes in the same order below or above the chord head.
Since virtual pages are independent editing sectors, you cannot have ties that cross page boundaries. This means that you cannot tie notes if the tie needs to go INTO bar 1 of the next page.
There are two solutions for this: The first is to silence the "to be tied to" note, if this note lies in bar 1. Select this note and reduce its volume to 0, to make it inaudible. In this case, the original note (the one the tie starts FROM) will naturally sound a bit shorter, since the tie will not be there, but you could also apply a forced sustain on it, to prolong its duration.
The second solution is to leave out the last bar on the offending page, and continue editing from the first bar on the next page. This way, you are transferring the contents of bar 16, 32, etc, onto bar 1 of the next page, into which you can tie normally.
Since the parser ignores gaps that occur at the end of the page, if those gaps occur in ALL channels, the compiler will parse the music correctly. See section on Tuplets on Page Boundaries.
To speed up editing operations recalculation of bars takes place when a bar is completed time wise (i.e. when the sum of all the symbol durations in a bar equals the Metre time). However recalculation may happen at any time that the program considers appropriate. The editor is optimized for speed if you are editing near the end of Logical Pages. What this means is that you get the fastest response if the bars past the edited bar to the end of the edited Logical Page are empty. If you have completed for example 100 bars on channel 1 the editor can be quite slow if you are editing bars near the beginning. It is therefore highly recommended that you input your symbols in parallel between channels rather than sequentially since the editor's internal symbol calculator recalculates the entire document starting at the current edited bar to gain speed. Also, keep in mind that the smaller the durations (thus the larger number of symbols per Logical Page) the slower the editor will be, as it has to deal with more data.
Replacing Symbols In The Middle Of A Page
Follow the steps below:
It is recommended that the to-be-replaced symbols and the replaced-with symbols have
equal durations. Otherwise your replacement may force major recalculations.
When you select one of the "Play" menu commands that executes a Virtual Composer document or an AIFF file, the application allocates all necessary memory, queues the music via QuickTime's Music Architecture system and executes the music. Playing is asynchronous, meaning that as soon as the music starts executing, the application returns to its main operations allowing you to continue editing your document. After the music starts, you can easily switch the application to the background and continue working with other programs. If you have a fast Macintosh, you can leave Virtual Composer in the background while it is playing an entire folder. See section Playing Entire Folders.
You can search for three kinds of patterns through the following dialog:
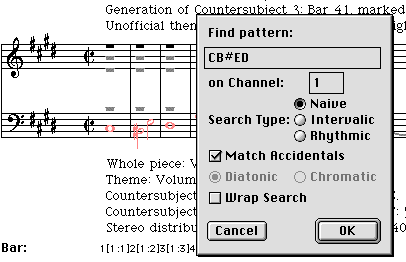
A "naive" pattern is specified using the repeated syntax T[M], where T is the symbol type and M is an optional modifier accidental. If the symbol type is a note, T is the name: (A, B, C, D, E, F, G) and M is one of the following: [#, x, b, bb, a, aa]. If it is a pause, T is P. For example, the above pattern will force the program to search for a C, a B sharp, an E and a D. Similarly a pattern like "GA#CxPPDbGaBbb" will force a search for a G, an A sharp, a C double sharp, two consecutive pauses, a D flat, a G with an Anaeresis and a B double flat
The pattern is searched on the specified channel.
If option "Match Accidentals" is checked, the search algorithm will try to match the pattern exactly. If not, accidentals are ignored on both the specified pattern and the found pattern. That is, the pattern "GA#CxPPDbGaBbb" will match the more general channel pattern GACPPDGB and conversely, the pattern GACPPDGB will match all score patterns of types G[M1]A[M2]C[M3]PPD[M4]G[M5]B[M6], where M1, M2, ..., M6 are any accidentals.
An "intervalic" pattern is specified using an appropriate sequence of strings, "+/-n,"/"P,", where "+" or "-" represents the direction, "n" represents the step between two notes which can be either diatonic or chromatic and "P," represents a pause gap between two symbols where at least one is a rest, with a comma always appended at the end.
The following search example in the Fugue IV document, will pick up most occurrences of the main theme if "Diatonic" is on:
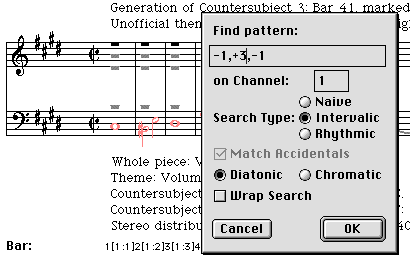
From C to B# there is -1 diatonic step, from B# to E there are +3 diatonic steps and from E to D there is -1 such step.
Similarly, if you wanted to use chromatic intervals, you could check "Chromatic" and search instead via chromatic intervals. In this case, your string would have to be "-1,+4,-1", as from C to B# there is -1 chromatic step, from B# to E there are +4 chromatic steps and from E to D there is -1 such step.
Finally you can search for rhythmic patterns if you check "Rhythmic":
A rhythmic search patters consists solely of the durations of the pattern notes in thirtysecondths. Thus, the string "32,16,16,32", above, will try to match instances of a whole, two halves and another whole. If you need to search for rhythmic patters which contain dotted notes, simply use their exact duration in thirtyseconds: I.e., a dotted quarter would be 12, a dotted eighth would be 6, etc.
If option "Wrap Search" is checked, the search algorithm will continue searching from the beginning on subsequent repeated searches via the "Find Again" menu item.
If you don't want to specify a search pattern explicitly through the dialog, you can enter it via the "Edit->Copy" or "Edit->Copy Bars..." commands. Simply copy something and then use: "Edit->Find Clipboard".
The search specifications are preserved, so if your search was intervalic, the clipboard is converted to the appropriate string before it is searched for.
Note: If you need to perform intervalic searches that contain pauses in them, use the symbol "P," as follows: Suppose you are searching for the pattern: ABAPDE. Your diatonic search string will then have to be: "+1,-1,P,P,+1,". In other words, you have to include the "P," symbol for every inconsistent pair: (note, pause), (pause, note), (pause, pause).
Also, if a contiguous note segment contains tied notes, you HAVE to specify the tied
notes as "+0,", otherwise the search will not locate the desired pattern properly. For
example, the following variant of the theme (red), will not be picked up by a
"-1,+3,-1," pattern search:
It WILL be picked up, if you used either a diatonic "-1,+3," or a chromatic "-1,+4" string or if you used an explicit diatonic: "-1,+3,+0,-1," or a chromatic: "-1,+4,+0,-1," search string.
All the above applies when the document contains chords as well, except that your
search specifications have to take into account chord incidentals in the search order,
IN THE ORDER YOU HAVE ADDED THEM. For example, in the following:
You will have to specify the chord interval as well for a diatonic intervalic search, so you'd have to use "-2,+3,+1," for example, if you are searching for the first 3 notes. In this particular case, your search will be matched three times in channel 1.
Replicating The Exact Search Syntax
You can perform a cool little trick to see what the pattern of what you are searching for looks like. Here's a simple example:
Version 2.8.3 and higher supports stationery and locked documents. You can create a
stationery document by selecting "Save As..." and selecting "Stationery"
from the saving options popup menu. You can lock a document via the
"File->Lock..." command. A document can be neither stationery nor locked
(normal), stationery, locked or both. Here's a summary of what you can do with the
various states:
| Status\Function | Edit: | Play: | Print: | Export As: |
| Normal | Yes | Yes | Yes | All Types |
| Stationery | No | Yes | Yes | All Types |
| Locked | No | Yes | No | AIFF only |
You can revert a stationery into a regular document by unchecking the corresponding "locked" and "stationery" flags on the finder's info window, however you CANNOT revert a locked document, so exercise caution when locking documents. ALWAYS LOCK ONLY COPIES of your originals and NEVER the original. If you lock your originals you will not be able to recover them. I have added the locking option for composers who want to make sure that their documents will not be modified by other users when they distribute them.
Regular Virtual Composer documents have what is called in Mac parlance, a "resource fork". The resource fork is actually a separate file segment which can be manipulated with special routines and it exists only on a Macintosh. Windows files have no such fork.
Because the resource fork is proprietary to Macintoshes, it gets lost when a document containing such a fork is transferred in a network. Same thing applies to the Internet, unless before you send the file you first compress it using Stuffit and/or encode it using BinHex.
To overcome this problem, as of version 3.1 I have added provisions for the program to be able to save in a file that has no resource fork. I will herefrom denote this format, "Windows format", for obvious reasons, in that such a document cannot only be sent efficiently over the Internet without any encoding, but also because this format will be used in subsequent versions of Virtual Composer for Windows.
The Macintosh version of the program will open both kinds of file formats and read/write/play normally both of them. If you desire to send the file over the Internet, it is recommended that you save it first in this format. Then you can just attach it to your email message and send it over. It will be comfortably read by versions of Virtual Composer higher than 3.1 on either machines.
CAUTION!! Beware however of a little glitch: On the Macintosh, associations between applications and their documents are generated using an elaborate method of using "creator" and "type" codes, which you may be familiar with.
On a Windows machine, such associations are usually generated by observing the last three letters that are appended to the file name, after the dot. The so called "File Extension". Files or documents created in a Windows machine have no "type" or "creator" information that the Macintosh version of the program can use when it tries to open a file. As such, I have made provisions for the Mac version to also look for the extension ".vcw" and to treat such files as "openable".
Note however that "openable" in the Macintosh sense is not always the same as "recognizable" by the program, unless the document indeed contains valid Virtual Composer data inside. If you therefore create a file on a Windows machine or change the file extension of an existing file to ".vcw" and pass it to the Mac version of Virtual Composer and the file does not contain valid data, it can cause Virtual Composer the crash very badly.
A very crude test is made by Virtual Composer at the time of opening to try to ensure that the file is a valid Virtual Composer file, but there is a likelihood that the test may pass even though the file does not contain data the Mac version can use. In such a case, you will get the dreaded crash.
It is therefore advisable that you NEVER change the file extension of a file to ".vcw", unless you are certain that the file contains Virtual Composer data.
Virtual Composer files saved as Windows files will have a new desktop icon associated with them with the letters "PC" on it. To see this icon you need to rebuild your desktop, because the bundle resources of the program have changed and your Finder will not know about it until you rebuilt your desktop.
As of version 3.2, I have added one more file format to the available ones, which henceforth will be called "binary" or "executable". The corresponding saving option can be found in the Format popup menu when you save your document.
Executable documents contain nothing but the binary code that's passed into the QuickTime synthesizer, after you compile your score. They cannot be printed, but they can be edited. They provide for a convenient way to replay a long score quite fast.
Virtual Composer will open such a document and will allow you to "Play->Instant Replay" it. A small window with minimal information will be displayed while you have such a document open:
Saving in the above executable format is quite convenient for long scores which take a long time to compile.
As of version 3.5.9, you can export Binary Documents as AIFF, MIDI or Movie. To do
this:
Virtual Composer's Export Formats
You can export the music in a variety of formats:
Virtual Composer's Execution Clock
The following info is for people who would like to know the program's exact timing considerations:
The program's clock executes 512 units in one second. I have defined Virtual Composer's note durations to correspond to time "units" via:
dur/32 * 512, where dur takes the values (in thirtysecondths): [1 (= thirtysecondth), 2 (= sixteenth), 3 (= sixteenthDotted), 4 (= eighth), 6 (= eighthDotted), 8 (= quarter), 12 (= quarterDotted), 16 (= half), 24 (= halfDotted), 32 (= whole), 48 (= wholeDotted)].
Accordingly, Virtual Composer will execute exactly 32 thirtysecondths (or one whole) in one second, at tempo 100%. You can easily deduce all other execution speeds based on the value of the "Tempo" scroll bar. (For example, at tempo 50%, Virtual Composer will execute at half the speed of 100%, which gives 16 thirtysecondths (or one half) in one second. (To calculate the execution speed of tuplets, you need to do some simple math based on the sum time of the tuplet group).
Needless to say that all of the above applies only iff you have not accelerated/decelerated any sections of the document.
Versions prior to 2.8.3, were very sensitive to desynching when tuplets were present
in the document or if the document contained non-homogenious accelerated sections. A
simple and elegant solution has been implemented in version 2.8.3 which corrects timing
errors stemming from tuplets and accelerated sections, roughly trying to re-synchronize
the channels after they have been desynchronized by either irregular durations or
incorrectly accelerated sections. As such you can now care a little less about
desynching in those cases and concentrate more on the music.
As of version 3.0 the accuracy algorithm has been improved further. The algorithm now
detects and accumulates desynchronization errors properly, so many of the older
examples that desynchronized slightly now sound almost perfectly. Particular examples
that were improved are: The Allemande with the triplets from Partita #5 and Goldberg
variation #20.
As of version 3.2 the resynchronization algorithm is now optional and the appropriate option has been added in the "Play->Preferences..." dialog: Automatically Resynchronize Channels.
Although it is recommended that you always leave this option on, its effects are most noticeable when the score contains a large number of tuples, irregular durations or non-uniformly accelerated sections.
You can still easily break the program's perfect timing, by accelerating/decelerating single channels. If for example, you ritard just one note on a specific channel, the rest of the notes on this channel will lag behind the music. Accordingly, this can be used to create arpeggios or other similar effects. I leave the details to your creativity.
If your Macintosh has poor sound output quality (less than 22kHz) or small speakers, a pair of earphones might help a lot. The best results can be heard if you have large external speakers or if you redirect the output to your favorite amplifier. In any case, headphones do make a lot of difference, so try listening to all the examples through a good pair of headphones. (I use the Sennheiser eh-1430). Alternatively, you can hook your Macintosh's speaker output to the back to an external amplifier and feed the music to your stereo system. The results of this are impressive.
Animation can take place on three windows: The main Music window, the Digital
Overview window and the Virtual Keyboard window. (from version 2.8.8 and above).
The animation on the main window simply animates the score symbols. On the Digital
Overview window it animates the digital note streaks. On the Virtual Keyboard it
animates the keyboard keys. To find out how to animate the Digital Window and the
Virtual Keyboard Window, consult the corresponding sections: The Digital Overview Window and The Virtual Keyboard.
Keep in mind that all animations are a function of your machine speed. While most of
the included pieces perform satisfactorily under their indicated speeds on my 75Mhz
Performa, don't expect the animation to be able to follow the music if you set the
score's speed to some ridiculously high value like 200% and the score consists of 16ths
or 32tdths.
I have tweaked the animation algorithm to the best of my knowledge, but if you have a
slow Macintosh, slower than 120Mhz, the animation might break at high speeds.
It is also recommended that you shut down any background applications before executing
any music with animation.
With this note, bare also in mind that using any of the menus while the animation is active or clicking on windows will desynchronize it. You can, however, scroll the corresponding animated window to follow up the animation if the speed is not very high.
For best results, decide which window you want animated, bring it to the front and select "Play->Compile & Play All". Don't switch windows or pull down menus while the animation is active. You can however scroll the corresponding window to catch up with the animated symbols if option Autoscroll Pages IS NOT enabled. In general, the Digital Overview window offers the best total animation, since its contents are drawn very fast.
Many users have asked me to have the program scroll automatically to the new page when animation is active.
As of version 3.2, this is possible, but read the following VERY carefully. An appropriate option has been added in the "Play->Preferences..." dialog: Autoscroll Pages. This option works in conjunction with the option Animate Symbols and if you set it to on, the program will automatically scroll the display to catch up with the animation.
If the Autoscroll Pages option is enabled, the animation algorithm will automatically scroll to the appropriate place while the music is playing, including going back to replay repeated parts if option Honor Repeats is enabled.
Note however that because the autoscrolling option forces the program to swap pages in and out as appropriate, which in turn causes a slight delay when the page is turned, it is recommended that you don't use it if you want to animate the Virtual Keyboard window or the Digital Overview window. If you want those windows to animate smoothly, turn this option off. To summarize:
It is conceivable that channel 1 for example may contain less notes or be less "dense" than channel 2. In such a case, input 2 as the guiding channel, which will force the algorithm to observe this channel when scrolling forward or backwards.
Needless to say that you should avoid specifying an empty channel as the channel guide, because then autoscroll will not take place, as the animation algorithm looks at the locations of the channel that's guiding the animation. Since an empty channel has no symbols, autoscrolling will never take place in this case. In general, you should specify as a guiding channel the most "populated" channel in the document.
PLEASE, DO NOT INTERFERE WITH THE ANIMATION, especially if the option Autoscroll Pages has been enabled, once the document has started to animate. You can of course stop the entire thing by pressing Command-Period, but avoid doing anything else, as this may cause a horrible animation desynchronization.
Beware that if your machine is a slow one, the autoscroll effect may not quite work as expected. This feature also does not work on 68k machines. You need to be running the application in a PowerPC machine.
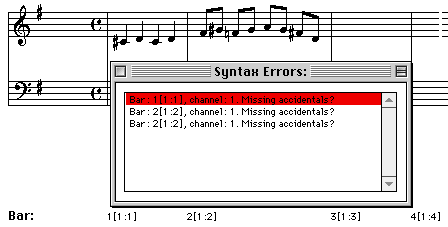
I have added a syntax-checking algorithm which simply checks for gaps between pages
and for missing or possibly forgotten accidentals. It is HIGHLY recommended that
you perform a syntax check as soon as you finish inputting all the notes in a new
document. It will save you a lot of grief trying to find out what's wrong and why the
music does not sound right. The command forces the program to notify you if you have
forgotten to place accidentals in bars and if there are time gaps between Logical
Pages. If the "Syntax Errors:" window comes up, double-click on one of the errors to be
transferred automatically to the offending bar and channel. Make your corrections and
recheck your document. To understand what Virtual Composer flags as errors, you have to
understand that Virtual Composer needs EXPLICIT accidentals on all notes, except for
those indicated on the scale signature. Thus, the following example, even though not
really incorrect, contains errors that in similar situations may give you hard time and
may have you searching in the document for corrections: The third note in bar 1, C,
will be interpreted by the program to be a C natural, but technically it needs an
anaeresis. The same is true of the 4th and 6th notes in bar 2. Those G's will be
assumed by the program to be G naturals, but chances are that if you have altered G
into a G#, they will be erroneous.
Instead, the correct syntax should either be:
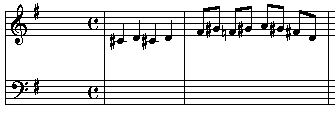
or:
Note that Virtual Composer simply ignores the sharp on the F since F's are sharped to
begin with.
The program usually ignores repeats in order to save memory. If you want to have it
honor any repeats, check option "Honor Repeats" on the
"Play->Preferences..." dialog. Doing so, forces the program to reserve and
allocate extra memory for all repeat symbols when parsing the document channels and
then plays through them properly. Because of additional constraints when executing
documents with repeats, the program performs several additional checks, including a
complete Syntax Check. If any serious errors are
found, the score will not be played, contrary to the case where repeats are not
honored, in which case the program does not really care what's on the score and if all
channels are properly aligned. This happens in order to prevent the parser from parsing
inconsistently any potentially incomplete or misaligned channels between repeats.
Repeats have to be balanced and cannot be nested.
The following score for example will not play if "Honor Repeats" is on, since the
channels are misaligned.

The following will not play because the repeats are not balanced.
The following will play fine.
You should also avoid tying notes or pauses if the tie crosses repeat bars. The following will play, since technically there is nothing wrong with it, but musically it is nonsensical, so it will naturally desynchronize the parser.
Note that since repeats need to be balanced, you need to place an explicit repeat bar on the first bar, if you want bars 1-n to repeat. In official nomenclature a repeat bar on the first bar is not required, but Virtual Composer needs all repeats in pairs, so it is required.
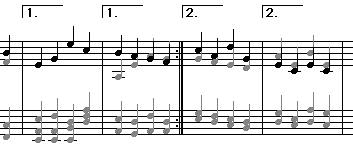
From version 2.9.1 and above the program also honors alternate repeat bars via the use of two additional Cursors, the normal repeat (|1) and the alternate repeat (|2) Cursor. Selecting either cursor and clicking inside a bar, will place regular repeat markers above them:
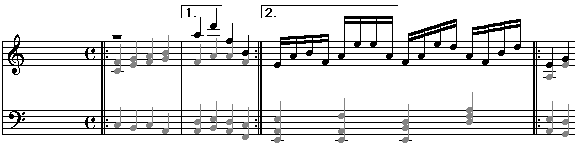
In the above example, if option "Honor Repeats" is on, the order of the played bars will be: 1, 2, 1, 3, 4, etc. The syntax checker will perform additional checks which pertain to the alternate repeats. Those checks make sure that:
The current implementation allows for repeat sections longer than 1 bar. So, for example, the following case is also allowed:
Also, beware that accelerating/decelerating sections between repeats, may cause the music to desynchronize. If you want the last bar to decelerate or if you MUST create an ending effect in scores which contain repeats, it's best to leave the last bar or the bars which are accelerated/decelerated out of the repeats. If you MUST include accelerated sections inside repeats, read the corresponding Accelerando/Ritardanto and Desynchronization sections.
Ornament execution throughout history depended heavily upon many different factors, including, but not limited to, the era the music was played. In most modern implementations, most of the regular ornaments, such as mordents, inverted mordents and long trills start ON the note indicated by the ornamented symbol and THEN do the appropriate shake. For example a regular mordent on a C, will execute as C-D-C and an inverted mordent will sound as C-B-C.
Shakes and Crown Trills are interpretation-dependent, but generally they are executed similarly to how Virtual Composer executes them in real time.
At the time of Bach, however, those rules were not as clear cut and several
variations were allowed. The "official" rules at the time of Bach were, for example in
the case of C:
Mordent on C: D-C-D-C, UNLESS the previous note IS D.
Inverted Mordent on C: B-C-B-C, UNLESS the previous note IS B.
Long Trill on C: D-C-D-C-D-C-...., UNLESS the previous note IS D.
Such executions as the above, were actually what we call today "double-trills" and fell back to single trills only if the previous note was the same as the first note of the trill, to avoid unneeded symphony.
As of version 3.5.3, I have added options for activating/deactivating single/double trill execution, to conform with the rules of Baroque music. The appropriate option is "Baroque Style" in the "Play->Preferences..." dialog. If this option is checked, all trills will be double, regardless of what the previous note was, which will allow you to fine tune playback of your favorite baroque pieces.
To summarize: Virtual Composer will interpret trills as follows:
and Shakes, as follows:
Another options has been added: "Ignore All Ornaments" which will disable all ornaments, so you can see what the piece sounds like with no ornaments added, without removing the corresponding symbols.
Using Implicit and Explicit Ornaments
The ornament Cursors are helpful in creating note ornaments, but bare in mind that
in some cases they may be inadequate in describing the situation exactly. Look at
channel 1 at the start of the "Courante" for example:
The second note is an E and it needs an inverted trill. Virtual Composer's internal
mechanism interprets ornaments by simply picking the previous note (for inverted
trills) and next note (for regular trills) looking at the scale signature. Since in
this case the scale is G major, (and thus there is no D#), the above example will
incorrectly interpret this as E/D(natural)/E. You would need to code such examples
manually, as follows:
Another example where a trill would fail to describe the situation would be the crown
trill at the end of the "Gigue_pt1" and "Gigue_pt2". One would think that the following
should be sufficient:
but it's not. Even though the trill on D will start correctly as a D# and the next note
will be a correct natural E, the previous note will be erroneous, as it will simply be
C natural, conflicting with the C# alteration on the previous notes. Instead, you need
to code this also manually:
Different Metres and Signatures In The Same
Document
Sorry, no metre or signature changes in the middle of the document. Implementing this would be a tremendously big hassle and would present specific problems related to the way the virtual pages of documents are implemented. See section on memory. If you MUST create such documents, you can create two different documents in Virtual Composer with a different metre or key signature, export them as abc and merge them with BarFly. Check the abc section. If there enough registered user requests, I MIGHT consider it in the future.
Virtual Composer is NOT a fancy music printer. There are virtually thousands of parameters one may want adjusted or fine tuned when printing musical scores and those parameters really go far beyond the scope of this program, which is to create perfectly timed polyphonic music. Virtual Composer is just a "quick-and-dirty" printing solution, as it is basically aimed at musical performance. If you want fancy printing, you can export as abc and print via BarFly or buy Igor or Lime.
When you print a document the program divides it into Physical pages. A Physical page will be as much score as will fit in one Physical paper page. Since the length of the bars and logical pages is determined using strict mathematical distancing it is almost impossible to arrange the bars of a physical page to terminate exactly at the end of a line without altering the bar sizes explicitly contrary to their exact positioning. I may incorporate this feature in a later release if I have time and I can figure out how to do it without much fuss. (The author is working on a solution that will allow the program to print bars terminating exactly to the right of the page, but it will take a while, so don't expect it out soon).
You cannot alter any printing positioning parameters but you can alter the note stem height and the minimum distance between the notes. This should be enough to produce decent quality printouts barring exact bar termination. You can experiment with the various features of your printer such as reducing or enlarging the printout, printing in landscape mode or in high resolution mode. Before printing you might also want to remove all the extra colors which might have been used to accent certain notes. See the Edit Menu for this operation.
From version 2.8.6 and up you can get 3 lines per page in normal portrait mode at
100% if the setting for paper size is set to A4. Since most printers for US users
default to "US Letter Size", you may want to set your paper size to A4 if you
want to print 3 lines per page. If you want more than 3 lines per page, decrease the
scale percentage to an appropriate value.
You can also use Virtual Composer to print out empty Manuscript Paper. Select
"New" from the File Menu and print the blank document after you set the Metre
and Scale parameters. You can either set the number of Logical Pages to and arbitrary
large number or repeatedly chose the "Print..." command until you get the
desired number of Physical Pages from your printer.
You can use the "Play->Folder..." menu command to play entire folders. Here's what happens when you select this command: Virtual Composer at startup allocates a Play List of size equal to the "Size" number you specify in the "Play->Preferences..." dialog. This play list is initially empty. If you select "Play->Folder..." then Virtual Composer scans the contents of the selected folder and adds any of its own documents or any AIFF files it finds to the play list. Then it plays the Play List. Two things are important here: Subfolders are not added to the play list, unless option "Include Subfolders" on the dialog "Play->Preferences..." is checked and the files added to the Play List are added in the order they appear in the folder's Finder List View. So, if you have a project which contains many files, make sure you sort the files to your liking by adding special characters to the file names and the included folder names before building the Play List. To have the folder contents sorted correctly, you can add numbers at the beginning of their file names. Look at the "Examples" folder where some projects have their files numbered as such.
To interrupt the playing of a Play List, press "Command-Period". If you do while a Play List is executing, the entire Play List will be aborted and not just the currently playing file.
Play List playing is of course asynchronous, in the same way a regular "Play->Compile & Play All" is asynchronous, but when a Play List executes all the menus except the "Play" menu will be disabled, to prevent inadvertent modifications to the active document while it plays.
You can in principle play an entire folder or project in the background, after you select "Play->Folder..." but I do not recommend it, unless you have a very fast Macintosh. If you do, you can give Virtual Composer the folder and let the program deal with opening, playing and closing all relevant files in the background. Do not expect the application's performance in opening and playing documents to be of the same order as when the application is in the foreground. When applications are running in the background, there's always a severe speed penalty that has to do with the fact that the processor does not yield as much time to a background application as the time it yields to a foreground application.
Once a document has been compiled, it can be replayed instantly via
"Play->Instant Replay". The tune that's kept in memory is whatever segment
was last compiled and mixed. That is: The "replay" tune is updated every time you
choose "Play->Compile Only", "Play->Compile & Play All",
"Play->Selection", "Play->From Caret" or
"Play->Backwards". The replayed version does NOT reflect changes that may
have been made to the document between compilation and replaying.
You can replay instantly after changing any or all of the associated QuickTime
instruments. Once a piece has been compiled, change the channel instruments to your
liking and select "Play->Instant Replay".
You can also save your document as an executable which can be loaded and replayed instantly. See section on Binary Documents.
Activating/Deactivating Channels
You can use the "Channel->Activate n" menu to create all possible voice combinations in a document and to create their corresponding mono/stereo AIFF files (below). Disabling a channel removes it from the editor and the channel will not participate when the music plays. You can also use this feature to create multiple printed copies of the same document if your document gets cluttered from having many channels printing only the channels you are interested in seeing. (You could for example print both the Saraband and the Double off the Coupled files by disabling the corresponding channels).
The Global Channel Controllers
Versions 2.9.1 and above add advanced global channel Controllers. These controllers are INDEPENDENT of the actual document contents and operate solely on the basis of the QuickTime synthesizer. They are initialized just before mixing occurs and are applied to each channel separately.
Here are some of the most common ones:
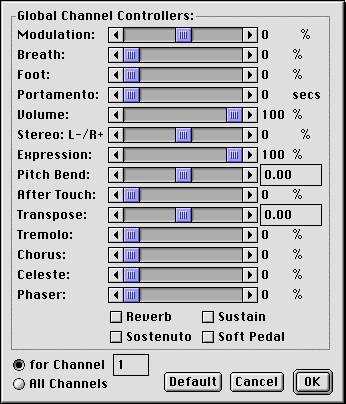
CAUTION! Playing a regular CD may temporarily disable the "Stereo/Pan" controllers. If you hear no stereo from Virtual Composer and the controllers are correctly set, restart your machine and launch Virtual Composer PRIOR to playing any CDs.
NOTE: The following controllers DO NOT work with QuickTime 4.x/5.0.1/5.0.2:
Breath, Foot, AfterTouch, Tremolo, Sostenuto, SoftPedal, Chorus, Celeste and Phaser. Apple has been notified of this and in fact the QuickTime team has confirmed that this is a known issue, but don't expect it to be fixed any time soon. The reason probably being that the original engineers who programmed these features in QuickTime have by now left Apple, so pretty much no one knows about their proper use, except me and Phil Taylor. However, should there be a future QuickTime release that fixes those controller bugs, Virtual Composer will honor them, since it follows stringent programming guidelines and the application's implementation is not dependent on those bugs programming-wise.
(At the time of this writing, QuickTime 7.x is out, but I haven't had a chance to check whether Apple has fixed this bug or whether these controllers work with the newer QuickTime version).
If you are an advanced QuickTime Hacker, you can fiddle with the QuickTime controller knobs after reading Phil's Advanced Hack for Musicians and be able to tweak some of the ones that don't work so that they may in fact start to work, but I don't recommend it. Do it at your own risk.
(For example, the "Sustain" controller works, but if your instrument is a continuous sound one, like a violin, the sustain will be infinite and the sound will never pause. This is because this controller defaults to "infinite sustain" in QuickTime. By creating a new instrument which has a specific non-infinite sustain, you may be able to change the effect of this controller).
In addition to the Global Channel Controllers above, you can add local QuickTime
Controllers that act on individual notes. A new Cursor has been added as of version 3.0
which resembles a little scroll bar. To add a local controller, activate this cursor
and click against a symbol: A similar scroll bar icon will appear at the bottom of the
page:
If you subsequently click on this icon, the local controller settings dialog will come
up. It looks like this:
The QuickTime Controller popup menu allows you to select from within the same selection as the corresponding Global Channel Controllers. The main difference here is that local controllers OVERRIDE the Global Channel Controllers on a per note basis: While Global Channel Controllers act on an entire channel, the local controllers operate locally and may very well override any Global controllers you may have set.
What this means, is for example, that while by using the Stereo controller you could send an entire channel to the left speaker, you can, now using local controllers, control where individual notes get sent, independent of what the global controller does.
A couple of notes here: Local controllers ALWAYS operate on pairs. That is, if you activate a local controller that alters the Portamento for example, you need to have another one later on, to cancel it. Otherwise, the Portamento effect will affect all the notes from the note is applied on, till the end.
You can delete individual controllers using the Eraser Cursor, but any editing operations such as cut/clear/paste, will remove the controllers from the caret ON.
If you save your final piece as an AIFF file you will notice the QuickTime sound export dialog that allows you to specify the output options for the file (below). These are the File Use (mono/stereo), the Sample Size (8 bits/16 bits) and the Sample Rate (44.1kHz, etc.).
In versions prior to and including 2.9, Virtual Composer put all the music into one QuickTime Music track, with a Pan (more commonly known as "Stereo") setting of "middle". This necessitated the use of splitting the music into separate AIFF files and then joining them to create true Stereo AIFF files.
From version 2.9.1 and above you can make use of special global channel controllers and particular the Pan/Stereo controller which can distribute the sound uniformly between the two speakers in your Mac. So now there are two ways to produce full stereo files:
The new way via use of controllers:
Follows a simple example of how to create very high quality stereo AIFF files by using
QuickTime's global channel controllers:
The old way:
Follows a simple example on how to create very high quality stereo AIFF files by using Virtual Composer's "Play->AIFF->Mix..." file command:
Note that you can reverse the speaker channels by reversing the order of file selection in the subsequent dialogs of the "Play->AIFF->Mix..." command. This means that the file you pick first will go to the right speaker. The second file will go to the left. Reversing the order -i.e. picking the second file first- will naturally reverse the speaker order.
Note also that by creating stereo AIFFs you may encounter the QuickTime bug. In particular spurious notes in the AIFF, including the final ones, may not sound right. (Notes shorter or longer). See section on Known Bugs, below.
AIFF export dialog settings are preserved as defaults if you save your preferences at least once.
Pieces that are variations of themselves can be coupled easily with the command
"Play->AIFF->Mix..." The Sarabandes and Doubles from English Suite #6 by
Bach and by Handel are such examples. The double is a very close variant of the
Saraband so it can be coupled with the original so you can hear both at the same
time.
This effect could have been achieved by creating a single 10-channel file and putting
all the notes from both the pieces in but this would have cluttered the score. (I have
added those corresponding files anyway, named "Coupled". You can achieve the results
below by disabling the corresponding channels on the Coupled scores). Instead, follow
the steps below to listen to what both pieces actually sound like:
You can save segments only of the score as AIFF/MIDI files, by selecting a range of symbols with the Selection Cursor prior to selecting "Save As..." AIFF or MIDI. The saving procedures of Virtual Composer look at your selection first and if it is non empty, they save what's under the selection (all channels). If the selection is empty, Virtual Composer saves the entire file. NOTE: If you have deactivated some (or all) channels under the selection make sure that the selection is non empty. Otherwise the program will generate an error.
Creating AIFFs of Documents With Different Time and Scale Signatures
You cannot change the Metre or Scale signature in the midst of a document. See Different Metres and Signatures. However, this is not really a nuisance, since you can create two separate documents (having different Metre signatures), save them as AIFFs and then stitch them together via "Play->AIFF->Join...". The Lute Suite contains several files with some of them having different time signatures. Consult the section on Mastering Large Projects.
You can use the "Set Volume..." settings to enhance the music considerably. You may want for example to make a theme more audible. This involves a few steps:
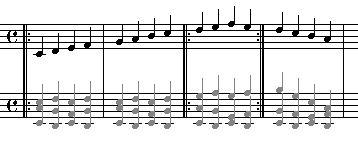
If you check option "Display Dynamics" in the
"Edit->Preferences..." dialog, Virtual Composer will display for you the
dynamics of the entire piece at the center of all pages:
While this can clutter the score considerably, it is not much of a nuisance and you can easily discern which parts the dynamics indicate, particularly since the indications are always associated with their corresponding channels. It is obvious for example, above, that the ffff's correspond to the blue, red and green voices, while the solid mf's correspond to channel #1.
The approximate mapping that Virtual Composer uses between volume percentage and markings is as follows:
90-100: ffff
80-89: fff
70-79: ff
60-69: f
50-59: mf
40-49: mp
30-39: p
20-29: pp
10-19: ppp
0-9: pppp.
Changing the Staccato of Notes
You can use the "Set Staccato..." dialog to create staccato effects similarly to using the command "Set Volume..." above. Select the range of your choice and then select "Set Staccato...". A note with a staccato setting of 100% is continuous and sounds for its full duration. Settings of x% force the note's sound duration to be (actual time duration) times (x%), without altering the note's actual time. If a note's staccato is less than or equal to 80%, it will be indicated graphically on the score.
Accordingly, if a note's staccato is GREATER than 100%, the note will behave as if it is sustained through a mechanism similar to the Pedal mechanism on the piano. If this is the case, a small pedal mark will be displayed at the bottom of the page.
Changing the Staccato and Volume Settings Globally
You can change an entire document's settings using the global "Channel->Set
Volume..." and "Channel->Set Staccato..." dialogs. You can also
selectively change the Staccato and Volume of individual groups of notes via the the
corresponding dialogs in the "Selection" menu. The global Volume and Staccato
dialogs are very similar:
In the above example, clicking "OK" will set the volume of all eighths in channel 1, to 50%. If you had clicked "All Channels" instead, all eighths in the document would have been set to a volume of 50%. The Staccato dialog is very similar. You can optionally remove any previous individual settings, by specifying first "All" on the popup menus, with Volume and Staccato set to 100%, but this is not required.
In addition to the "Sustained Attack" effects which are simulated by setting the staccato percentage of notes in a selection to values GREATER than 100%, one can easily simulate what's called in official nomenclature, a "Delayed Attack".
Notes with a delayed attack, sound a bit after their corresponding score time. You can simulate such notes, using the following logic:
The Editor in Virtual Composer allows for chords which can consist of BOTH notes AND rests, provided the CHORD HEAD is a note. Therefore, you can input a chord whose head is a note and all the rest of the chord symbols, i.e. the chord incidentals, are rests. If now you force the chord to be an arpeggio, by clicking on the chord head with the arpeggio Cursor, the compiler will be tricked into thinking that the entire chord should be played as an arpeggio.
But all the bottom chord notes are rests! Which means that the compiler will execute the chord head after as many delays are introduced by the chord incidentals, forcing the chord head to sound a bit after the chord's time. Here's what it looks like in practice. The notes in red will be played as if they were delayed:
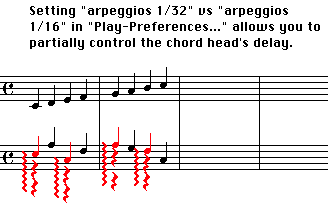
You can in principle create many variations on the above theme, by noting the many different parameters here. The basic parameters are, the number of symbols in a chord (let's say n) and whether arpeggios are executed as thirtysecondths or as sixteenths. Following this, one can easily see that the "delay" after which the chord heads in the above example will be executed, will be precisely 2 thirtysecondths AFTER the corresponding chord time, if option "Arpeggio Chord Notes" is set to 1/32, or will be 2 sixteenths AFTER the corresponding chord time, if the same option is set to 1/16.
In general, if n is the number of symbols in a chord and all are rests except the chord head which is a note, then the delay for the chord head will be:
(n-1) * x, where x is either sixteenths or thirtysecondths, depending on the option "Arpeggio Chord Notes" in the "Play->Preferences..." dialog, when you execute the music.
Note, of course, that this also forces the chord head to sound PAST it's actual time, by the amount it was delayed. So, if you want to be really diligent about it, you could apply an appropriate Staccato percentage to the entire chord, to reduce the individual symbols' durations, so as to shorten the duration of the chord head, a bit.
The possibilities here are too many to list individually. Feel free to experiment.
The "Selection->Set Volume... " dialog allows you to simulate real crescendo and diminuendo situations based on the starting and ending scroll bar values. The volume of the first note in the selection range will be set to the start volume, the volume of the last note in the range will be set to the end volume and the volume of all the notes in between will be set to a uniform increasing/decreasing sequence of volumes between the end values. Only notes are affected and if there are pauses in between they will be treated as if they were null notes. (In other words pauses will belong to the increasing/decreasing sequence but their volumes will be zero). (Fugues XX, VI, the Fughetta, the Minuet and the Preludes have been manipulated in this way).
The "Set Accelerando..." dialog allows you to micro-tune the speed of individual notes. After the dialog is brought up you can specify the amount (as a percentage) by which to accelerate or decelerate your note range. While this works as you should expect, beware that it can cause your music to desynchronize. This means in particular, that if you want a whole section to accelerate or ritard, you have to apply the settings dialog to ALL channels that fall under the selection or check option "All Channels" in the "Set Accelerando..." dialog and even then this is not guaranteed to not desynchronize the music. It is useful for creating "ending effects", effects where moderate sudden acceleration or deceleration is needed, such as when the document falls out of sync after a streak of tuplets or to break the program's perfect timing. Use it judiciously and with caution. Do NOT use it to change the overall speed of the score. Use the "Speed" scroll bar control in the "Play->Preferences..." dialog, instead. The example file "Prelude" from Suite IV has been modified at its last bar to create an "ending effect" using this feature. The "Prelude" from the Lute Suite has also been accelerated at its beginning as well as "Fugue XX".
Here's an example on how to accelerate/decelerate an entire section:
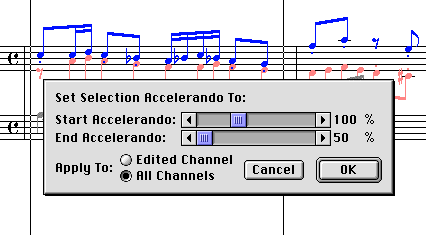
In the above example, the music will start with a speed of 100% that of the speed of the piece in the "Play->Preferences..." dialog and will decelerate uniformly to 50% of the actual speed at the end.
The acceleration works as follows:
As of version 3.4, the fermata factor in the "Play->Preferences..." dialog can accept extended input, allowing the possible factors to vary from 1 to 300% times a symbol's actual duration. This means that whereas in earlier versions the shortest duration you could have was one thirtysecondth, from version 3.4 and on, this value drops down to a hundredth of a thirtysecondth.
Values in the range 1-99% actually now SHORTEN the duration of the symbol the fermata lies on, so in this case it's more properly called a "negative" fermata. Values in the range 101-300% EXTEND a symbol's duration.
Of course negative fermatas in the range of 1-20% are ridiculous and will not even produce audible sounds except as clicks. However, on higher duration notes, namely quarters, halves, etc, putting a fermata on top of them and then setting the fermata factor to small values can force the program to simulate various non-existent features, such as appogiaturas or even luftpauses.
As with the regular applications of the fermata, you should place fermatas on all corresponding symbols in all channels, otherwise you risk throwing the channel out of balance.
The fermata factor is global and applies to ALL symbols in a document that have a fermata on them.
WARNING!! If you have older documents which used the old fermata format, they will now show a fermata of 2%, since the fermata input was changed from being an absolute multiplier (2 for example) to a percentage (200%). Open all your older documents, select "Play-Preferences...", change the fermata to a percentage and resave your documents.
The Virtual Composer examples have been converted automatically.
You can easily simulate a luftpause, by judiciously applying a fermata on the symbol PRECEDING the symbol which should have a luftpause before it. Here's an example:
Suppose you want a 1/32 luftpause between two quarters.
In all similar cases, Virtual Composer will display a small comma after the note which has such attributes, called, in official musical nomenclature: a Luftpause. An example document has been included in the Examples folder.
As of version 3.1 you can simulate arpeggios directly via the use of the Arpeggio Cursor. Input a chord normally, then select the Arpeggio Cursor and click on the chord head, making sure the tip of the Cursor clicks exactly on the chord head. The chord will then change visually to a chord with the familiar wiggled symbol to its left:
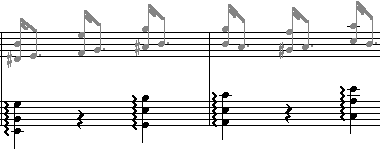
Chords which are arpeggiated, can be basically executed in two different ways, depending on the option "Arpeggio Chord Notes" in the "Play->Preferences..." dialog.
If option "1/32s" is clicked, the arpeggio chord notes will be spread out like thirtysecondths. If option "1/16s" is clicked, the arpeggio chord notes will be spread out like sixteenths. Look at the new included document, the Chopin Etude #5 to listen to how arpeggio chords sound when both options are enabled.
The arpeggio facility can also be used to simulate notes with a Delayed Attack. See the corresponding section.
Caution!! The arpeggio algorithms, assume that the chord to be arpeggiated has the correct internal structure and the notes have been input in descending order. I.e., it assumes that the chord head is the top note and the chord incidental order is the same as what is visually shown. In other words, the input incidental order is 2, 3, 4,... from top to bottom. If this is not the case, that is, if you input chord note incidentals which are not hanging at the bottom of the chord, the arpeggio algorithm will play a different arpeggio which will match your incidental input order. In such a case, the arpeggio symbol will not cover the entire chord. This is not really a bug. The arpeggio algorithm parses chords in exactly the order you input them, so if you intend to use arpeggiated chords, please input them from top to bottom always.
Alternatively, you can simulate arpeggios via the use of "Set
Accelerando...". By using some simpleminded logic, you can force one ore more
channels to lag behind, thus giving the impression that chords are played as arpeggios.
Here's an example. Suppose you have the following score segment:
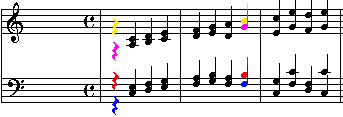
Let us simulate some arpeggios on the first 7 chords:
All the above modifications in conjunction with the creation of Stereo AIFFs can produce some impressive results, which will depend on the effort you make and the particular modifications themselves. The combinations are many.
As of version 3.3 I have added an advanced heuristics facility. The facility's dialog is intended as an aid to the user to be able to set some of the basic parameters which control the volume and the staccato of an entire channel (or an entire document). Please use it judiciously and with caution, since the changes are not undoable. Here it is:
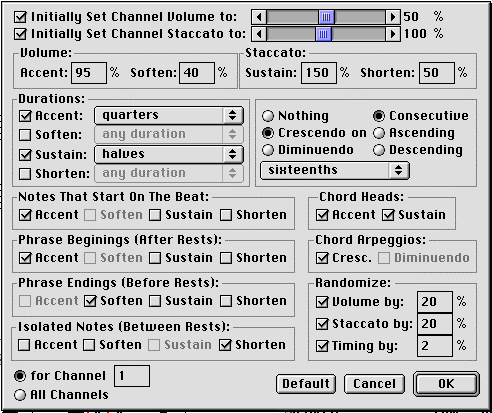
Most of the options are self-explanatory, so I won't go into detail explaining them one by one. I will only mention some things which I consider important in the dialog's application:
The application of the entire set of options can be either RELATIVE or ABSOLUTE.
If you set either option: "Initially Set Channel Volume To:" or "Initially Set Channel Staccato to:" to TRUE, all the options are applied AFTER the entire channel is reset to the values shown on the scroll bars to the right of these options. If BOTH these options are set to off, the entire set of the rest of the options is applied ON TOP of the channel's existing settings.
The subsequent volume and staccato percentages shown as Accent/Soften, Sustain/Shorten, are the actual values which get applied to the symbols that meet the program's criteria. In the above example, all accented notes will be set to volume 95%, all sustained notes will be set to staccato 150%, etc.
Since both options: Accent/Soften relate to volume, they are mutually exclusive. The same holds for options: Sustain/Shorten which relate to staccato. Therefore when you check one of two mutually exclusive such, the other option will be disabled automatically to prevent nonsensical results.
The heuristics facility applies the entire set of options to the channel of your choice in the following order:
In the above example, if a note has a volume of 70%, it's volume after the randomization will become (70 +/- x) %, with x being a random amount in the range [0, 20]. So it could well become anything between 50% and 90%.
The other two randomization options work similarly. Be careful with the Timing Randomization, because if you use large percentages, you may throw the entire channel out of balance.
Some users suggested that I added some sort of "keyboard" like a virtual piano so I did. It's located on the "Window" menu.

Certain things need to be clarified here: This is not meant to be a replacement for
a MIDI keyboard, rather, it is intended as a quick and dirty solution for people who
want to try out chords. The keyboard's range has been extended to include all MIDI
notes in the range 0-107. On a regular QWERTY keyboard the central keyboard keys can be
invoked using the corresponding computer keyboard characters, as they are displayed on
the Virtual Keyboard keys.
There are two options in the "Play->Preferences..." dialog that relate to the
Virtual Keyboard:
To animate the Virtual Keyboard:
Changing the Virtual Keyboard, the Echo Note and the Note Click Instruments
The Virtual Keyboard will assume the current QuickTime Instrument of the active
edited channel. If the main Music window is closed and thus no edited channel is
available, the keyboard will default to a piano.
If the checkbox "Echo Note On Input" is checked, the notes will echo through
piano by default.
Notes will echo through piano by default also on Note Clicks with the Object
Cursor.
To change the Virtual Keyboard QuickTime Instrument or the Echo/Click Note Instrument,
just select a different QuickTime Instrument from the QuickTime dialog.
(It is kind of fun to see the actual notes appear on the Music window after the various sounds and to try out chords with the different QuickTime Instruments since the mini test keyboard that the QuickTime Instrument selection dialog displays does not allow chords. This feature may prove to be of some value to music beginners who want to see a relationship between piano keys and actual notes. At some point in the future I will add support for a MIDI interface so keep checking the newer versions on my site).
The Digital Overview window displays the score contents in a very compressed "chromatic interval" digital representation. While this view does not really offer much information to the untrained eye, to the trained musician, it can reveal a plethora of patterns and tricks, which can be used to analyze a particular score. Even if you are not a professional musician, the corresponding digital graphic is interesting by itself, particularly on complex multi-voice pieces, like the Bach fugues, where it is more than obvious that many intelligent patterns lurk inside the score which are not easily visible otherwise to the untrained eye.
Since the contents of this window are not as complex as the contents of the main window, animation on this window is much faster when you scroll on it, since its contents are drawn very fast.
The Digital Overview contents are simply "time streaks" with lengths exactly equal to the duration of the corresponding score note. Accordingly, a thirtysecondth is 1 pixel wide, a sixteenth 2 pixels wide, a dotted whole 48 pixels wide, etc.
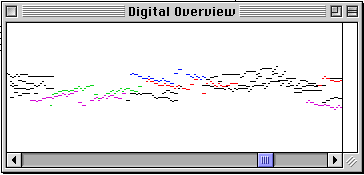
Note that since the minimum streak length is 1 pixel wide (thirtysecondth), this representation suffers on tuplets since tuplets do not have integer numerators in their time fraction. Therefore, tuplets cannot be displayed on this window. If you try to invoke the Digital Overview window menu command ("Window->Digital Overview") on a score which contains tuplets, the corresponding channel that contains the tuplets will not be displayed. If all channels contain tuplets, the window will not display anything. You will be alerted to this fact before hand.
To animate the Digital Window:
As of version 3.1 you can also examine the QuickTime object code that's passed onto QuickTime's tune player.
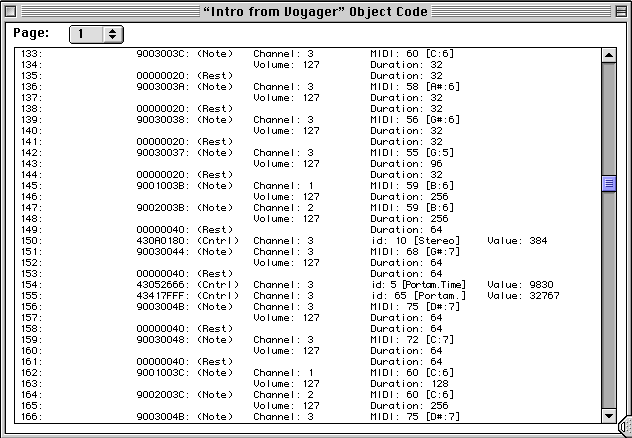
Examining the disassembled view is useful when comparing a known piece with its MIDI equivalent object code. You can then spot easily errors based on the correspondence between QuickTime's object code and Standard MIDI file object code.
Column #1 is the QuickTime long word offset + 1. Column #2 is the QuickTime event op-long word that's passed into the tune player by the program. The rest of the columns contain various parameters depending on what the op-long word is. If the op is a controller event, subsequent columns show the controller id and the controller value, while for note events, the columns show the MIDI channel, the MIDI note number, the MIDI volume and the QuickTime duration in ticks. (Remember, 512 ticks per second at speed 100%. See section on Execution time).
The popup menu on the top left allows you to navigate between all the disassembled pages. A maximum of 50 pages with 600 lines each can be disassembled, which amounts to the object code that's passed to QuickTime being 50*600*4 = 120,000 bytes of executable QuickTime code.
As of version 3.5 you can use Virtual Composer to edit the internal disassembled code that's passed to QuickTime's tune player. This can be useful to power users who may want to fine tune or adjust some of the parameters that are passed into the QuickTime synthesizer, like MIDI values, durations, controller values and channel numbers.
WARNING: Using this facility carelessly or erroneously can result in unplayable tunes, desynchronized channels, disabled synthesizers and other strange behavior, which may force you to need to restart your Macintosh in order to remedy the problems. Please edit those values only if you are absolutely certain of what you are doing.
Follow the steps below if you want to examine and edit your score's disassembled code:
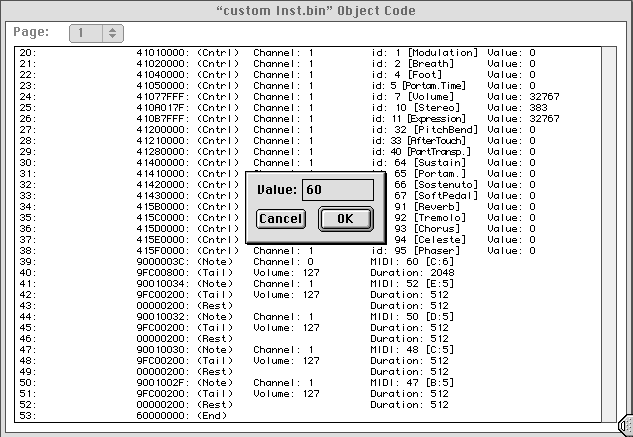
The cell that has been clicked, above was the MIDI value cell in row 39. You can then input a different value there, altogether.
The first two columns cannot be edited, as they contain values crucial to QuickTime. The second column's long words, however, will be adjusted automatically to conform with the newly passed parameter to the right.
The rest of the columns can be edited and the values can be changed to your liking. QuickTime channel numbers correspond to Virtual Composer channel numbers as follows:
QuickTime channel = Virtual Composer channel - 1.
In other words, channel 0 in the disassembled code window is channel 1 in Virtual Composer, etc.
You can now edit the MIDI values for example and change them altogether, send notes that occur in a certain QuickTime channel to another channel or alter the channel controller values.
NOTE: The menu item "File->Save" activates when and if you change any of the values in the disassembly window, so you can conceivably save the new contents. To prevent inadvertent modifications to your executable binary documents, the "save" behavior for this window is slightly different than the corresponding behavior of the main score window. There will be no warnings about an "unsaved" or "modified" binary document, so you have to save it explicitly, otherwise your changes are thrown away when you close it.
Creating Tunes with Microtonal Values
WARNING!! QuickTime 5.x is buggy and does not allow correct playback of microtonals. If you want to experiment with microtonals, you will have to either downgrade to QuickTime 4.1.2 or upgrade to QuickTime 6.x/7.x.
Let us follow a certain procedure that will allow us to listen to a particular microtonal example:
Preliminaries:
Well tempered notes in most synthesizers are produced by the resident synth when it
encounters what's called a "MIDI code value". MIDI values run from 0 to 127, covering
all the keys on a piano keyboard, with Middle C corresponding to the value 60. So, if
you know that Middle C is 60, then going downwards and left of Middle C, you will
get:
B6 = 59,
A6# (Bb) = 58,
A6 = 57, etc,
while going upwards, you will get:
C6# (Db) = 61,
D6 = 62,
D6# (Eb) = 63,
etc.
These are precisely the values you will see in the MIDI column in a disassembled binary QuickTime tune.
The QuickTime synthesizer however, has made provisions for producing not only the frequencies associated with all the regular MIDI values, but also for frequencies that lie between all those MIDI values, by allowing 256 divisions between every two successive MIDI values. This means, you can produce 256 different tones between Middle C and C#, or between any other successive MIDI values (thus between any two semitones).
The QuickTime synthesizer accommodates all possibilities, by accepting either a regular MIDI value OR a MIDI value AND a fraction as follows:
Regular MIDI:
| 0 | MIDI Value (60, etc) |
Micropitch MIDI:
| MIDI Value (60, etc) | x/256, where x lies between [0 and 255] |
To conclude:
You can either pass a regular MIDI value, or a value that encapsulates BOTH a MIDI value and a fractional part which indicates how many 256ths away from the base MIDI value the micropitch is. To find the exact value, you multiply the MIDI base value by 256 and then add the fractional part x. So, for example, if you want the micropitch which produces a tone that lies half way between C6 and C6#, the value that needs to be passed to the synth will be:
60*256 + 127 = 15,360 + 127 = 15,487.
The Procedure:
Here we go, then:
| 60 * 256 + 16 | 15,376 |
| 60 * 256 + 32 | 15,392 |
| 60 * 256 + 48 | 15,408 |
| 60 * 256 + 64 | 15,424 |
| 60 * 256 + 80 | 15,440 |
| 60 * 256 + 96 | 15,456 |
| 60 * 256 + 112 | 15,472 |
| 60 * 256 + 128 | 15,488 |
| 60 * 256 + 144 | 15,504 |
| 60 * 256 + 160 | 15,520 |
| 60 * 256 + 176 | 15,536 |
| 60 * 256 + 192 | 15,552 |
| 60 * 256 + 208 | 15,568 |
| 60 * 256 + 224 | 15,584 |
| 60 * 256 + 240 | 15,600 |
| 60 * 256 + 256 = MIDI Value 61 | 61 |
Now carefully edit the MIDI column and insert all the values above as shown. (the example already contains the correct values, unless you have saved a compiled tune on top of it)
Finally select "Play->Instant Replay" to listen to the microtonal frequencies.
It is worthy to note here that trying to export Virtual Composer documents as MIDI type 0 files doesn't make much sense, if the contents contain Microtonal values. QuickTime will export such files still, but they will neither play right in MIDI programs, nor will they display right. See section on known bugs.
CAUTION!! Custom Instrument creation does not work with version 7.x of QuickTime. Rather, it works, but QuickTime 7.x contains a bug which does not allow correct playback of such instruments. If you want to use Custom Instruments or if you want to multisample already existing QuickTime instruments, use Virtual Composer in Classic mode. See section on Known Bugs and Limitations
The QuickTime instrument library, contains a plethora of instruments, including drum kits, which were licensed from Roland.
It is conceivable however that an advanced user may want to use an instrument which has been sampled at higher quality than the included ones or an instrument which has been sampled at more instrument intervals than an instrument in QuickTime.
To aid with this, version 3.5 allows the import of a System 7 sound file (or AIFF/AIFC sound file as of version 3.5.2), which can be used for the creation of a custom Instrument. If you can sample a sound at home or at a recording studio, you can save this sample as a System 7 sound or AIFF and then use Virtual Composer to create an instrument using this sample. You can also save this instrument for later use.
Follow the steps below:
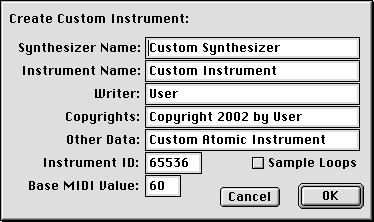
Custom instrument samples are limited to 226,136 bytes. They can contain, however, anything you want. A multivoice chord, human voice, sound effects, etc. I have included one example in the "Special Docs" folder, to see how it works. Follow the steps below:
[*] If your original sample is in a different format than a system 7 sound or an AIFF/AIFC file, use one of the freeware utilities, like SoundApp, to convert the sample first to a system 7 sound or an AIFF/AIFC file.
Creating Custom Instruments using Already Existing QuickTime Instruments
In addition to externally sampled sounds which can be used for the creation of custom instruments above, you could conceivably use the already existing instruments from the QuickTime Musical Instruments Library to generate new instrument combinations.
In this section we will follow the creation of a new instrument, which will be built based on the "Harpsichord" sample from the Quicktime Musical Instruments Library.
Some of the more specialized Harpsichords, such as those used by Wanda Landowska and Isolde Ahlgrimm, were renowned for their use of "double stops/registers", which allowed a single key to generate the sound of two strings being struck. Usually, such harpsichords will strike the string the key corresponds to, along with the string that corresponds to the note one octave lower than the key that's being struck.
The QuickTime Musical Instruments library contains a sample for a couple harpsichord, but it is not a very good one. Here we will create a "truer" Coupled Harpsichord.
Using some simple minded logic, it is easy for Virtual Composer to simulate a double-stopped harpsichord, by using a custom sample which produces two notes simultaneously: The original note, plus the note one octave lower.
Let's follow the procedure, then:
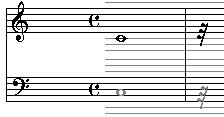
Using the procedure above, you can create virtually thousands of combinations from the already existing QuickTime Instruments. The above is intended as a guide for you to be able to combine existing instruments into new ones. In the above example, both channels are set to Harpsichord, but this is of course not necessary. You could even have 3 notes and set all channels to different instruments.
In general, creating a new custom instrument involves similar combinations to the ones above, but beware that having larger durations than a whole, would up the size of the sample to prohibitive sizes, depending on your sample rate and sample size.
CAUTION: When you create a Custom Instrument by using existing QuickTime instruments as above, it's always a good idea to wrap your note between rests. On the example above, a rest was placed after the note to force QuickTime to calculate a correct decay of the sample note. If you find that the attack (onset) from a Custom Instrumet created thus is too harsh, include a small rest, like an eighth or sixteenth BEFORE the note itself. This will make the attack of the note a bit more soft. What works best for me, is an eighth rest, followed by a dotted half and another eighth rest.
I have included a small set of custom instruments, some created by QuickTime Instrument combinations, others by having external samples. They are located in the Special Docs Folder.
Technical Specifications for Custom Instruments
As mentioned above, custom instrument samples are limited to 226,136 bytes, UNCOMPRESSED. This means that you cannot pass a COMPRESSED sample that's less than 220 Kilobytes and try to fool Virtual Composer into creating a custom Instrument. Virtual Composer will always decompress samples before creating Custom Instruments, so the size of your sample has to be less than 226,136 bytes UNCOMPRESSED.
Virtual Composer will decompress the most common compressed codecs, like MACE 3:1, MACE 6:1, bLaw and IMA, when you try to pass it a compressed sample, but there is no guarantee that your machine will contain all the available codecs that are responsible for effective decompression via other compression schemes. For best results, use uncompressed high quality 16 bit samples, sampled at 44,100 Hertz.
Virtual Composer can accept, however, any combination insofar as sample rate or sample size is concerned. You can create custom instruments with 8/16 bit samples and any sample rate.
Note that complex instruments in the QuickTime Musical Instruments library are sometimes sampled separately for separate parts of the instrument. You might have therefore to create separate samples for different octaves. See section below.
You can normally export documents that contain custom instruments in any of the supported formats, except perhaps the MIDI 0 format. MIDI players don't seem to recognize the custom samples.
The duration of your custom sample is naturally dependent on the duration of the
note you input in your document. The best duration is usually a whole at tempo 100%,
which gives exactly 1 second of sound (or 44,100 sample points), but you may
occasionally need to double this, by creating samples which come from TWO TIED
wholes, (or a whole at tempo 50%) thus giving 88,200 sample points. Note that the
size of the resultant sample is also dependent on your sample size (8 bits/16 bits).
Below is a table that will help you calculate the sizes of the resultant samples:
| Approximate Sample Size: | 8-bit Mono @ 44.1 kHz | 16-bit Mono @ 44.1 kHz |
| 1 Whole @ 100% tempo | 44 kilobytes | 88 kilobytes |
| 2 Tied Wholes @ 100% tempo or 1 Whole @ 50% tempo | 88 kilobytes | 176 kilobytes |
Please don't create custom samples that are stereo. The Stereo effect on single samples only doubles the memory required and does not add to the quality of the sample when it is used by QuickTime.
Multisampling Complex QuickTime Instruments
Complex instruments are occasionally sampled using different areas of the instrument. A good quality piano sample for example, may be created using three separate sample areas, such as low notes, middle notes and high notes. This avoids the well known problem of "aliasing", which is the inability of the resident synth to produce too high (or too low) pitches, given a single sample.
This technique is often known as multisampling. You can multisample already existing instruments with Virtual Composer and use the resultant samples accordingly in your documents as custom instruments depending on which areas of the instrument you want to use. The procedure below is really advanced stuff, so you really don't need to read it if you are not a serious sound buff.
We will follow the creation of a custom piano sample, which will be a combination of three QuickTime instruments, the Acoustic Grand, the Bright Acoustic piano, and Piano 1d, from the collection of already existing QuickTime pianos. Then we will use the resulting samples to listen to a piece by Bach.
We first need to decide which areas of the instruments we want to sample: Let's then sample the Acoustic Grand on the low notes, the Bright Acoustic Piano on the middle notes and finally the Piano 1d on high notes. These areas will correspond naturally to the three channels our piece will have.
For convenience, we will pick our samples to be C notes. We can pick the highest C on the lowest range, the Middle C on the middle range and the lowest C on the high range, since those will effectively be used to upsample/downsample our instruments later on.
We will therefore pick our samples as follows:
| Acoustic Grand: | MIDI: 48 |
| Bright Acoustic Piano: | MIDI: 60 |
| Piano 1d: | MIDI: 72 |
The value 48 corresponds to C5 (one octave below Middle C). The value 72 corresponds to C7 (one octave above Middle C). Here we go then:
In addition to creating custom instruments as shown in the corresponding section, advanced users can also multisample instruments contained in musical CD's.
The procedure is quite involved, that's why I decided to leave it as a separate section here and not include it in the program's manual. This section is by no means necessary for you to otherwise use Virtual Composer, so consult it as needed.
Preliminaries
In this section we will follow a quite involved example that creates a custom instrument which is used in a commercial CD. The CD involved is by Hungaroton, number HCD 12461-2 and the performer is Gergely Sarkozy, playing the Lute-Harpsichord. The Lute-Harpsichord has been referenced often as one of the gut-instruments in existence since the time of Bach, but the instrument itself has not survived. The most famous Lute-Harpsichord makers, were Johann Christoph Fleischer of Hamburg, Johann Nicolaus Bach (a cousin of J. S. Bach) and Zacharias Hildebrandt. It is not known what this instrument looked like and the only pictures we have of such instruments come only from a very rough 16-th century engraving. Current musicological research, has determined that this peculiar instrument was of particular interest to Johann Sebastian Bach.
System Needs
To do what we will do here, you need to have:
Let's begin:
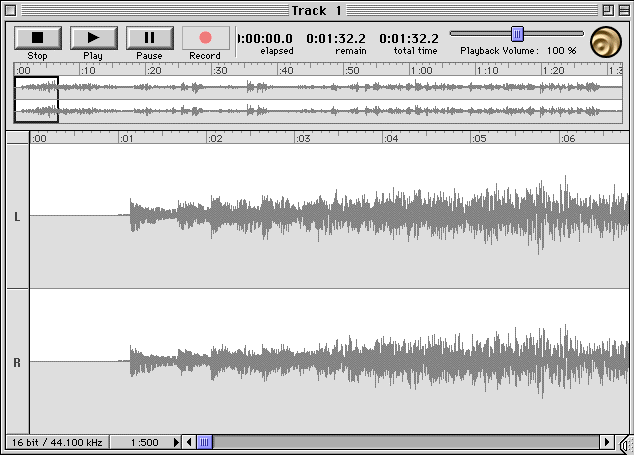
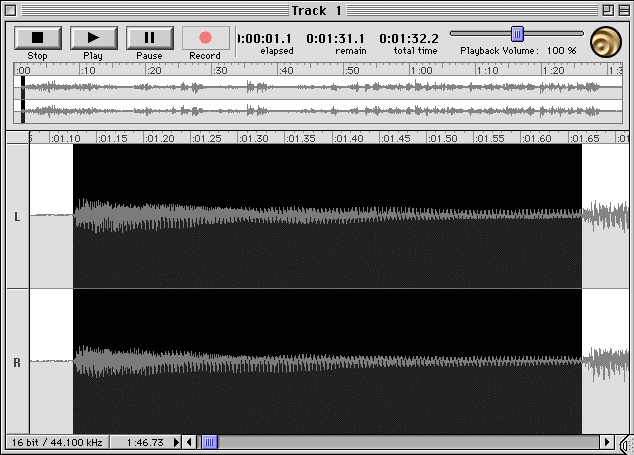

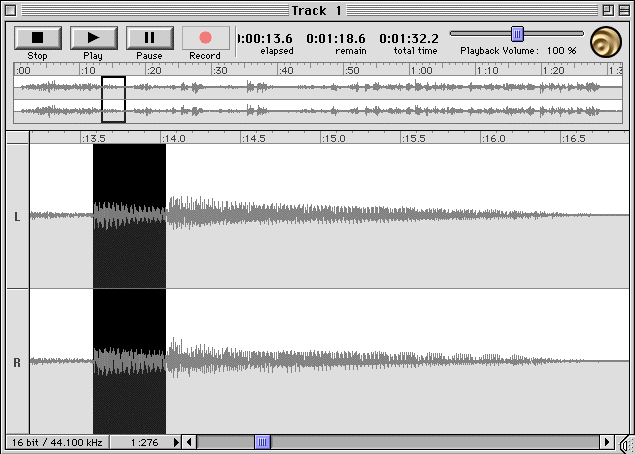

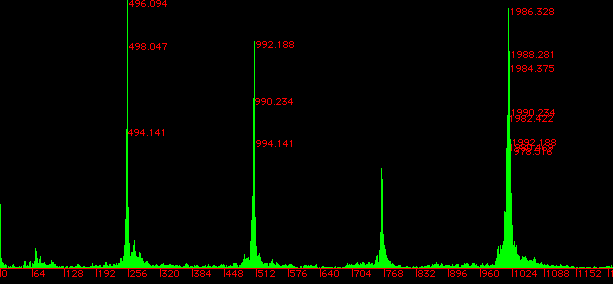
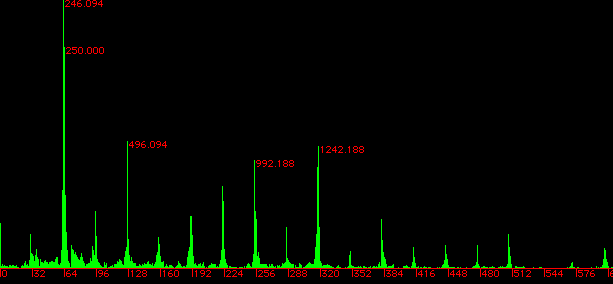
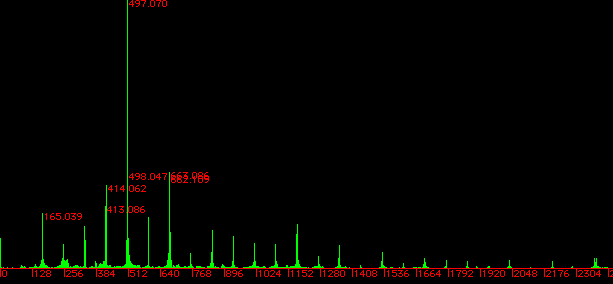
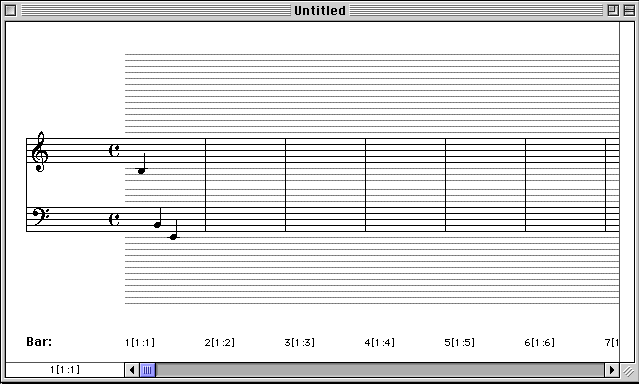
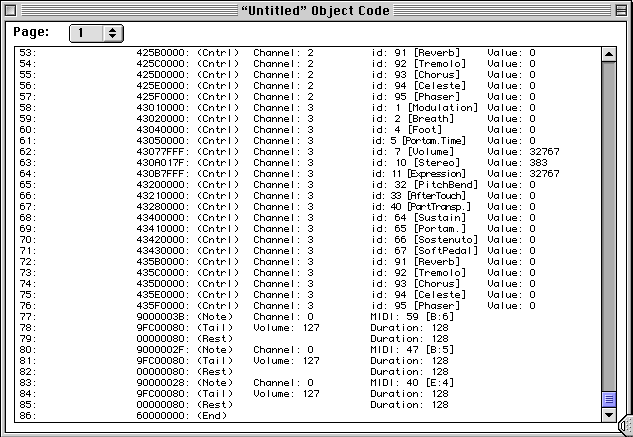
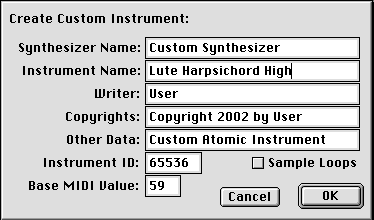
The example above is quite convoluted, but the basic principles should now be very clear to you. You can use Virtual Composer to apply essentially the very same ideas to oversample ANY instrument from your CDs and thus create virtually thousands of new custom instrument combinations from your musical CD collections.
The samples we have extracted above, were a little short (sixteenths), with the exception of the LHLow.aif sample, whose duration was a dotted eighth, giving thus a "truer" low note rendition. In general, the longer the samples you extract, the better sounding the custom instrument will sound. Of course, you have to ensure that you don't exceed Virtual Composer's custom sample size limit. More about this, here.
Sample length will depend basically on whether you are able to locate single, unornamented notes within your CD track, of reasonably long durations. As it has been specified in the corresponding section, samples of duration of one/two wholes at a tempo 100% should give the best results, but it is conceivable that a particular CD may not contain long, single notes. Particular CD's may not even contain single note samples at all, depending on the music contained therein.
It helps tremendously to have a hardcopy of the music at hand, so you can visually inspect the music and locate in advance whether the CD contains single note samples. Usually most kinds of music will contain some single samples, if you look carefully.
Your results of course will vary greatly, depending on whether you oversample the waveforms in the CD and on how many areas you use for the oversampling. In the example above, I used three separate areas for the oversampling, so all notes above MIDI value 59 are played by upsampling the Lute Harpsichord High sample, notes that have MIDI values between 47 and 58 are played by upsampling the Lute Harpsichord Middle sample and notes with MIDI values lower than 46 are played by upsampling/downsampling the Lute Harpsichord Low sample.
You can download the above example's Lute-Harpsichord custom instrument to use with Virtual Composer, here. (300 KBs).
You can also download Virtual Composer's AIFF output for the Prelude of the Lute Suite BWV 996 by J.S.Bach, encoded as an .mp3 file, using the custom Lute-Harpsichord instrument above, here. (0.8 MBs).
Using SoundFonts with Virtual Composer
In addition to using all the available QuickTime Instruments from the Musical Instruments Libraries, and custom instruments created as per above, you could also use SoundFonts. To use SoundFonts you need to have installed QuickTime 5.x/6.x/7.x. SoundFonts don't work with QuickTime 4.1.2, which is what I am using to develop and test the primary functions of Virtual Composer.
Although most good SoundFonts are commercial, you might be lucky and find some descent free ones. If you do, you can install a SoundFont (xxx.sf2 file) as follows:
MacOS9: Copy the xxx.sf2 file into folder "Extensions:QuickTime Extensions"
OSX: Copy the xxx.sf2 file into folder "Library/audio/Sound/Banks".
SoundFonts, when properly installed, will show up on QuickTime's Select Instrument dialog and you can then use them normally, like you would use any of the included Musical Instruments.
However, all QuickTime versions (up to the latest) have a bug which does not allow you to save an aiff file using a SoundFont. An aiff will be created, but the SoundFont will be substituted for a QuickTime Instrument with the same GS instrument number. See section on Known Bugs and Limitations.
Playing the Music in Different Temperaments
WARNING!! Correct playback of different temperaments, depends on Microtonals. Since version 5.x of QuickTime is buggy and does not allow microtonal playback, if you want to experiment with different temperaments, you will have to either downgrade your QuickTime to 4.1.2 or upgrade to 6.x.
The exact mathematical relationship between note frequencies has been explored since the ancient times, with Pythagoras setting the first rules that determined the relationship between those frequencies, as ratios to some fundamental frequency.
Many systems have been devised since then, and each system has specific shortcomings and advantages. Going into details about many of those systems is beyond the scope of this manual. For people who are interested in the history of development of temperaments, please consult the following links on the mathematics and development of different temperaments throughout history.
Most modern music is played in what's called today Equal Temperament. In this temperament, pure intervals are eliminated, in favor of playability in all scales. This temperament is of course Virtual Composer's main temperament. (And has been the main temperament in all previous versions).
As of version 3.5, I have added several different temperaments, in addition to the Equal Temperament. To see all available temperaments, select: "Play->Set Intonation..." and click on the popup menu. A dialog similar to the one below will appear:
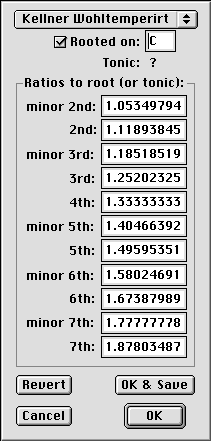
Changing the intonation/temperament via the popup menu on top, allows you to examine and edit the values of the ratios of the frequencies of all octave intervals to the frequency of the fundamental, called "root".
The root can be any note within an octave. This note is used as a basis, around which with the aid of ratios the frequencies of the rest of the octave notes are calculated.
The intonation can be either rooted, or unrooted. If it's rooted, the note shown to the right is used to calculate the frequencies of the rest of the notes. If it's unrooted, the frequencies are calculated using a note tonic, which can be the tonic of the key you are using for the particular score or another alternate note.
The following intonations/temperaments are included with version 3.5 of Virtual
Composer, in addition to the Equal temperament:
To save any of the values after you edit them, you need to save the program's preferences, which can be done via the "OK & Save" button.
WARNING!! If you change any of the values in the included intonations and save these values using "OK & Save", these values will be used every time the program starts up, since the program always reads its preferences at startup time.
Playing in different intonations/temperaments can be useful to advanced users and researchers of music who want to listen to microdifferences in frequencies. Most differences are audible only with trained musicians, but if you use an old intonation, such as the Pythagorean and tune to a root/tonic that's unrelated to the tonic of the key you are playing in, you can easily hear the dissonances that are generated by the deficiencies of the particular intonation.
Modern day music uses, as said above, the Equal Temperament, but one temperament researched by Dr. Herbert Anton Kellner, notably the Kellner Wohltemperirt-Bach temperament, is especially good for Bach, and sounds much sweeter than Equal Temperament. The logistics and Mathematics of Dr. Kellner's Wohltemperirt-Bach temperament can be found on my pages on Bach.
Comparing Frequencies of Notes in Different Temperaments
Different temperaments/intonations, are implemented in QuickTime using Microtonals. The frequency differences between such temperaments are often not audible except to people with trained ears. One could conceivably see/calculate the differences, however, using the Fast Fourier Transform facility.
The procedure for comparing such frequencies is pretty simple in Virtual Composer:
In the example below, we will see the frequency difference between two A6's, in two
different intonations, Equal-Temperament and Pythagorean, both tuned to C.
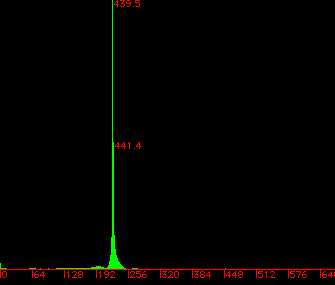
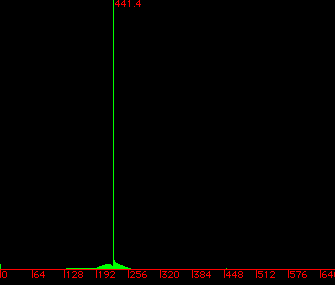
The particular frequencies for the examples above, are easy to calculate: The first spectrum, being the spectrum of an A6 under Equal-Temperament, is naturaly very close to 440 Hz. (439.5 Hz). For the second example, since we have tuned our pythagorean intonation to C, the C5 below A6 has a frequency of 220 Hz * Equal-Tempered Minor Third = 220 Hz * 1.1892 = 261.624 Hz. Therefore, our Pythagorean A6 will be at: 261.624 Hz * Pythagorean Sixth = 261.624 Hz * 1.6875 = 441.4905 Hz, which is what you see in the second picture.
Virtual Composer was designed to principally deal with symbols that have integral
numerators in their fractional time value such as wholes (32/32), halves (16/32),
quarters (8/32), eighths (4/32), sixteenths (2/32), thirtysecondths (1/32) and their
dotted equivalents. (Except dotted thirtysecondths). However in order to allow for
occasional irregular groups, symbols with non integral numerators may be accommodated.
Version 2.8.3 offers a better support for tuplets, via the "Group..." command,
which now offers an option as to how to tie the desired group, via a subsequent
dialog.
Several constraints are imposed here, but they have been lessened relative to those in
earlier versions. The selected to be tied group, has to start on the beat or end on the
beat and the last note of the selection has to be the last channel note. Additional
constraints are shown below and they will show up on alerts if you try to tie illegal
ranges. The basic constraints are as follows: You can tie a range of x1,
x2 or x3 symbols in the time of y, z or w symbols, hencefrom
denoted as (x1..x3, [y, z, w]).
Simple metres:
Input the first symbols of the beat that will be tied to a tuplet and invoke the "Group..." dialog as follows:
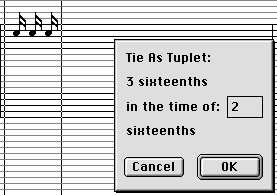
Tying a selection that ends on the beat into a tuplet:
Input the last symbols of the beat that will be tied to a tuplet and invoke the "Group..." dialog as follows:

Tying a tuplet selection into a whole beat:
Input the desired symbols that will be tied to a tuplet and invoke the "Group..." dialog as follows:
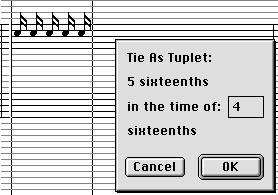
You can also tie pauses along with notes in a tuplet. See the included document: "Tuplets" for some more extreme combinations.
To untie a tuplet group, just cut a selection of symbols from within the same bar as the tuplet group or select "Untie As Tuplet" on a tuplet range. Beware that untying a tuplet group on a completed (timewise) logical page, will cause a timing overflow on the edited channel.
CAUTION: All operations that involve editing of symbols IN BETWEEN other
symbols force the removal of ALL tuplet groups. I.e., if you Cut, Copy, Paste,
Clear, insert or remove in any way symbols that have other symbols right of
them, all tuplet groups past the edited symbols will dissolve. In particular copying
any range of notes from within a tuplet group will force the copied notes to dissolve
into regular notes. Tuplets are NOT removed if your editing operations take place at
the end of the Edited Logical Page's channel. The reason for this removal is that the
internal duration calculator can deal only with symbols that have integral numerator
values when it recalculates the document. Otherwise nonsensical results might
occur.
Some of the example files show how tuplets execute when they appear in a document.
"Fugue V" from the WTC uses tuplets that start and end on the beat and "Tuplets" uses
an example score to show how regular tuplets sound.
Since the program always needs at least one more bar to have the prospective tuplet notes entered before you group them into a tuplet, you might have a small problem with tuplets on bars that are multiple of 16. (i.e. bars 16, 32, 48... etc.). In these cases, omit bar 16, 32, etc altogether, and continue your work on the first bar of the next page, like it's shown on the following example:
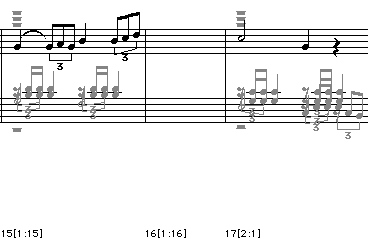
Since the program's parser only cares if the channels are properly aligned (and in this case they are, time-wise) it will correctly compile scores which omit bars at the end of pages, provided all channels have the corresponding gap.
If you use text in your document keep in mind that the music editor assumes some minimum consistency from your part about the placement of the actual text. While all text is drawn "above" the regular score, it can happen that some music editing operations may interfere with the extra text. You could conceivably cook up a situation where the music editing may conflict with the text editing or vice versa. (Selecting music ranges that contain text fields or initiating text fields inside a music range). It is impossible to predict all conflicting combinations. It is recommended therefore that you move your text fields out of your editing positions and when you are done with your music editing bring them back in, repositioning them with the Arrow Cursor. Also, keep in mind that the entire viewing rectangle of your text MUST be visible, otherwise you won't be able to type any text.
The Fast Fourier Transform Facility
You can perform several different analyses on various files via the command "Channel->Spectrum...". First and foremost, you can perform a Fast Fourier Transform on AIFF files via the command "Play->AIFF->Spectrum...". You may want for example to generate the Fast Fourier Transform of a waveform of a particular QuickTime Instrument. Follow then the steps to create the Fast Fourier Transform of a QuickTime Musical Instrument:
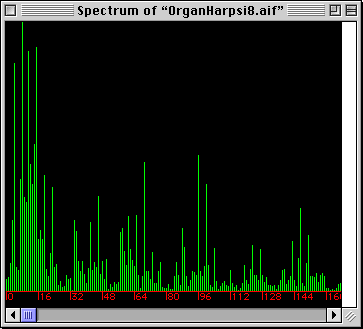
The x-axis is your data index n, which varies in [0..dataSize-1] and dataSize is always a power of two, i.e. dataSize = 2n. Your y-axis is simply the amplitude of your signal data points. In the above example, you can clearly discern for example that the dominant harmonics are the n = 8, 69, 96, etc., with corresponding frequencies, n*sampleRate/dataSize.
CAUTION!! When your data is pure real, (i.e. in all cases except with Stereo AIFFs, "dataSize" is actually double what the right window limit is, since the spectrum is symmetric with respect to the center datum and the program chops-off the symmetric half, so modify your calculations in these cases accordingly as: Freq = n*sampleRate/(2*dataSize))
You can perform a Fast Fourier Transform on Virtual Composer documents as well. You can select among 5 different types of data to perform the Transform on:

Note Frequencies uses the actual document well-tempered note frequencies as
data for the Transform.
Note MIDI Values uses the actual document note MIDI Values as data for the
Transform.
Note Names uses the actual document note Names (A=1, A#=2,...G#=12) as data for
the Transform.
Exponents n on: uses the frequency exponents n of the note frequencies as data
for the Transform.
Chromatic Intervals: uses the chromatic intervals between notes as data for the
Transform.
If option Subtract Average From Data is checked, then the weighted mean value of all the data is subtracted from the corresponding set of data, in order to eliminate what's called in Fourier Analysis "the DC Component", i.e. frequency 0.
In the case of document spectra, all the data are reals. In the case of AIFF audio files, the data can be either real or complex. If the input AIFF file is mono, the data is pure real. If the AIFF audio file is stereo, the right channel data is considered real and the left channel data is considered imaginary and then the FFT is applied to the complex data.
When the data is pure real, the spectrum is symmetric with respect to the center datum dataSize/2 - 1, so the symmetric half is chopped off. When the data is complex, the spectrum is not symmetric, so it is shown in its entirety.
If option for Channel x is on, the signal data is simply the step function that's constructed from the corresponding channel data, whereas if All Channels is on, the signal is the consecutive signals from all the channels.
You can save the resulting spectrum as a PICT or print it immediately, using the corresponding File menu commands.
Don't input AIFFs of unreasonable size to the FFT facility, because the results will take very long to generate. Acceptable AIFF file sizes are from 0 to 3-4K.
(You can perform several interesting correlations between different pieces and see how the pieces relate to each other by using this facility. I won't go into details here as this manual is not meant to be an introduction to signal processing, but perform a Fourier Transform on similar pieces and look at the corresponding spectra. Try for example perform an FFT on the two Bach Preludes: The Small Prelude from the Anna Magdalena notebook and Prelude III from the Well-Tempered Book number II.)
You can also see a document's Statistics via the command "Channel->Statistics...". This command is useful to get a general idea on what the overall structure of a piece is. A window similar to the one below will appear after the program calculates all the relevant data:
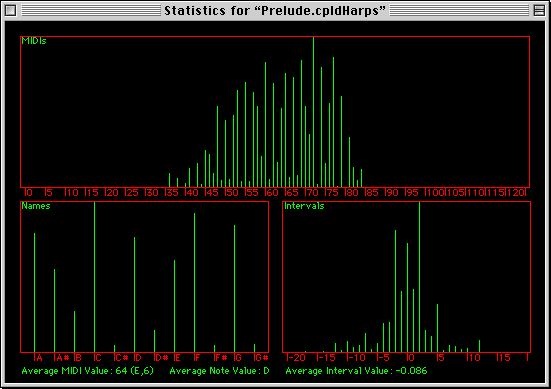
The three frames show the frequency distribution of the three different sets of data that are present in the document of your choice: MIDI Values, Note names and Interval values. Interval values are limited from -20..20, and in all cases the most used value is the one with the highest spike.
You can also see the corresponding averages in the last line.
You can save the resulting statistics as a PICT or print it immediately, using the corresponding File menu commands.
The abc format is a new way of writing music using only ASCII text symbols. It was invented by Chris Walshaw as an easy way of transcribing folk music and is still being developed. Eventually, it should be possible to represent any music as abc. As a computer format it is extremely efficient (you can store thousands of tunes on a single floppy disk), but it is not just a computer file format; with a little practice it is perfectly easy to sight read and if you need to write down some music and don't have any manuscript paper to hand, it's a very useful pencil and paper language too. For a full description of the language, to other software and to sites with tunes in abc format, go here.
Virtual Composer can output the contents of the edited file as abc. Select "Save As..." and click on the "Format:" pop-up menu on the file-save dialog to select the abc save option. The abc output of Virtual Composer is optimized for use with Phil Taylor's abc music program BarFly. (See the included folder "BarFly examples") As such, it uses several extensions, which only BarFly knows about. In particular, trills, mordents, fermatas and some other features may not be available if you use a generic abc program. The abc output of Virtual Composer should be easily understood by BarFly with little or no editing. If your Virtual Composer score contains more than one channels when you import Virtual Composer's output to BarFly select "Align Voices" in BarFly so that the score displays correctly. Previous versions could output only one bar per line. From version 2.8.3 and above, you can control several of the output options though the following dialog:
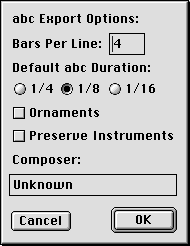
"Bars Per Line" allows you to specify how many bars a single voice line will contain in the output. A good rule of thumb is: more than 4 bars per line if there are no score notes smaller than quarters and halves. If your score contains lots of 16ths and 32ndths, you may need to use 2 or even 1 bar per line, so that BarFly can display the score properly. The allowed values are 1, 2, 4 and 8.
"Default abc Duration" allows you to specify the default abc duration in the export file. Use the duration that matches the majority of the document notes to make your export abc document smaller in size and to avoid unnecessary calculations.
If you check "Ornaments" Virtual Composer will generate symbols for the ornaments that exist in the original score. In order for all ornaments to play ok in BarFly, you need to tell BarFly to include the document: "Bach Ornaments" (in the "abc Users" folder), which contains extended macro definitions, by selecting "Global Macro File...", and feeding it this document. Please note that Phil Taylor reserves the right to change the contents of this document at any time he considers appropriate, so if you download BarFly, make sure you replace this document with its latest version, which will be the one included with the BarFly download. ("Bach Ornaments" macro BarFly document, © and courtesy of Phil Taylor).
If you check "Preserve Instruments" Virtual Composer will preserve all QuickTime instruments so BarFly can recognize the QuickTime instruments that are used in the original document. If you leave this checkbox unchecked, all instruments will default to piano in the abc export.
The "Composer" text edit field, allows you to specify the name of the composer, which will be displayed by BarFly on the top right margin of the abc exported document.
Also remember to correct your accidentals since Virtual Composer uses explicit accidentals for all the notes in a bar contrary to BarFly which uses them according to the correct rules. (I.e. the accidental is active for the duration of the bar unless it is canceled by an anaeresis). However, if you follow the conventions for accidental notation as they are outlined in the section Checking For Syntax Errors, there shouldn't be many problems.
You might also want to edit the treble/bass fields, to correct for inconsistencies that may arise from incorrectly calculated clefs:
V:1 treble program 1 0
V:2 treble program 1 0
V:3 bass program 1 0
V:4 bass program 1 0
...
by changing between "treble"/"bass", until BarFly's display accommodates all channels
to your liking. Virtual Composer picks the output clef based on which clef the majority
of the notes lie. You may also include inline clef changes, by inserting an appropriate
[K:Treble] or [K:Bass] field between the notes in BarFly.
You can change the BarFly instruments, by editing the numbers after the 1's.
BarFly does a better job generally than Virtual Composer on printing, so you may want to invest some time to learn at least the basics of how to export abc and import it in BarFly.
The included abc files are Virtual Composer's output for some of the pieces by Bach which are included in the folder "Examples". BarFly's page is here.
The MusicXML file format is becoming increasingly popular, that's why we decided to add a MusicXML export module from version 3.4 and on. This means that now you can export Virtual Composer scores into XML and have them possibly imported by another program that accepts MusicXML input.
If you are unfamiliar with MusicXML, the best place to start is Recordare, LLC. Recordare's web page contains everything you need to get you started, including software that can read MusicXML.
In short, MusicXML is an XML superset of HTML, which follows similar basic syntax, but is especially suited for musical notation. Like abc it is a TEXT format, but is naturally more verbose than abc, since its commands usually take longer space.
However, as you can easily observe, both Music XML and abc are especially efficient in terms of musical transfer. Files exported as MusicXML which have sizes of half a Megabyte, can be compressed with Stuffit or ZipIt to extremely short sizes, around 9-10K. Such small sizes are even smaller some times than the corresponding MIDI export.
The MusicXML export module in Virtual Composer requires you to fill in some default fields:
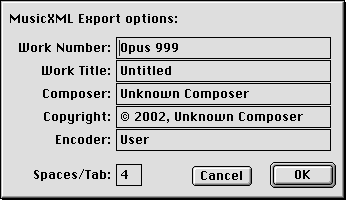
The fields are self-explanatory of course. The only one needing mention is the "Spaces/Tab" field which can greatly reduce your memory consumption if you input smaller values in the range of [1..4]. Anything greater, up to 10, will pad your XML display with the indicated number of spaces, so your XML output can grow in size tremendously. The output, will usually look like this:
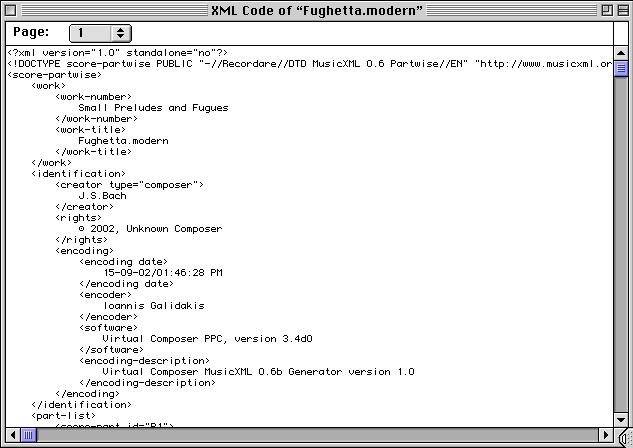
As you can see, it looks a lot like HTML, but the objects are different. You can inspect visually both the MusicXML and the abc output as of version 3.4, by invoking the corresponding commands from the "Window" menu. These commands produce a screen readable version of the export, which is identical to the contents of the corresponding exported files.
Several notes here: MusicXML is a very verbose language and may easily cause Virtual Composer to run out of memory if you try to generate the visual output. If you really MUST see the output of a long document, break it into smaller segments and try visually exporting these, or export into a file and use an independent TEXT editor to read the exported file.
The program won't have problems exporting to file however. Expect your exports in MusicXML to be largish, around half a megabyte and even more.
I have not tested all possible MusicXML output of Virtual Composer, so it is conceivable that the program may produce erroneous code in some convoluted instances.
In particular, the generated code is not guaranteed to be correct if your document does not pass a complete Syntax Check. Please make sure that the document's syntax is correct before exporting to file or importing the exported code to other programs.
I have also left the MusicXML export modules unlocked in the unregistered version of Virtual Composer, which means you can export just about all the included examples and import them to Finale if you have it or another program that can import MusicXML. For a list of all the programs that can read and play MusicXML, consult the Recordare link, above.
The exported file places different Virtual Composer channels into different XML staves. This means that if your Virtual Composer has 8 channels, you should expect to see 8 different staves in Finale or whatever program you use to view and play the exported files.
Mastering Large Projects and Cutting onto CDs
You might want to create a large project with several AIFFs to cut into a CD, either raw or as mp3 files or you may want to stitch together two AIFFs that correspond to documents with different Metre or Scale signatures. Here's detailed instructions on how you can create a single AIFF for the entire Lute Suite number 1. It is recommended that you read the section Creating a Stereo AIFF first, before you proceed.
WARNING!! See copyright section if you intend to cut CDs and you are not the author of the music!
IMPORTANT! Creating huge AIFF files presumes you have LOTS of available space on your hard drive. For this project you should have AT LEAST 200 Megabytes free on your hard drive.
You should also have QuickTime version 4.x or later for all the instruments to sound correctly with this example. If you have earlier versions of QuickTime, select the appropriate instruments on all the files below before you attempt to create the corresponding AIFFs', since I have selected QuickTime 4.x instruments in some of them which do not have corresponding QuickTime instruments in versions earlier than 4.x.
The correct order of the files in the Lute Suite is as follows:
First, check option: "Honor Repeats" on the "Play->Preferences..." dialog, to make sure repeats are saved into the AIFFs. Then:
Now you should have the following AIFF files in one of your directories:
You can now listen to the entire file by selecting "Play->AIFF->File...",
and selecting the file: "suite.joined.aif" or you can import it to your favorite AIFF
player program.
The final AIFF file, will be largish, around 90-95 Megs.
Note that the above method assumes that you want to create Stereo AIFFs by making use of the Stereo AIFF mixing feature. You could, of course, replace the entire production sequence above by appropriate sequences that simply set the "Stereo" channel settings in all pieces, thereby distributing the channels to your liking then simply saving the pieces with all channels enabled and then stitching them all together. The last process is obviously easier. Consult section on Global Channel Controllers to set the Controllers to your liking.
You can now use a CD burner to cut this last file onto a CD or choose to input it in an mp3 encoder like mp3 Encoder, DropMP3, BladeEnc or N2MP3Pro to reduce its size. If you convert it to an mp3, expect its size to drop down roughly to one tenth of what the original was, but also expect loss of quality, depending on the mp3 encoding bit rate.
Alternatively, from version 2.9 and above, the application is scriptable, so you can effectively automate the entire production process. See section Scripting, below for more information.
As of version 3.0, I have added partial support for Standard (type 0) MIDI file imports. It is recommended that you read the following VERY CAREFULLY before you attempt to import any MIDI files.
The Standard MIDI format (type 0) is a quite smart format. It essentially allows for a much greater variety of elements than VC allows internally, therefore some serious restrictions had to be placed on what VC can do with those files and even then, VC will miss a lot of files.
The principal difficulties have to do with the fact that MIDI files can contain:
Chords with unequal durations are allowed in Virtual Composer via the use of tying chords, but picking up a MIDI file and having an efficient algorithm that converts chords with notes of unequal durations into tied chords in Virtual Composer is virtually impossible.
The most significant problem that may arise with MIDI files, however, stems from the "timing" that's used inside MIDI files. MIDI files do not contain explicit note "durations", rather, they contain Note On/Off events that are picked by the resident synthesizer and are interpreted accordingly.
Any specific MIDI event, is "time-referenced" against the immediately previous MIDI event. This "time-difference" is called "Delta-Time". Therefore, any specific MIDI event's "tune-time" is the sum of all the preceding events' delta-times.
Delta-times are represented as synthesizer "clock-pulses" and are created by the synthesizer which sequences the contents of the MIDI file. Those very delta-times are used by Virtual Composer to calculate the subsequent note durations. If they are wrong, sequenced badly, inaccurate, contain small mistakes or are not sequenced correctly relative to the MIDI file's timebase, the import will abort.
As of version 3.1 the MIDI import algorithm has been improved slightly, insofar that the program will attempt a "normalization" of the existing delta-times, by performing a roundoff of a "bad" delta-time to the nearest representable duration's delta time.
What this means is that if quarters have 120 ticks duration using the file timebase and Virtual Composer sees a note with a duration 120+-n, it will turn it into a quarter. n is determined internally and is usually the delta ticks of a thirtysecondth minus 1.
While this will increase your chances of the MIDI file being successfully imported, it is not guaranteed to succeed 100% of the time either. The MIDI file may still contain delta-time inaccuracies or it may violate some other rule from the 6 conditions above.
Also, the following dialog has been added as of version 3.2.1:
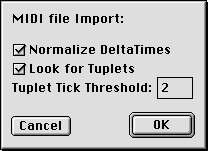
The Normalize Delta Times option controls whether you want the program to round whatever delta times it finds to the closest multiple of a thirtysecondth. If this option is checked, then all delta times, regardless of whether they are exact multiples of 1/32s or not, will be converted to such exact multiples. If it is not checked, the program will extract the largest integral duration that fits inside the read delta time.
The Look for Tuplets option controls whether you want the program to search for delta times that match irregular durations. If this option is enabled the program will try to match such delta times to their appropriate groups as best as it can, using a delta time threshold indicated in the editable box below. If it is not checked, all irregular delta times will be converted to an exact multiple of a thirtysecondth.
The number Tuplet Tick Threshold, is used for matching as follows: The program will recognize a tuplet note if its delta time falls within +/-2 of the exact theoretical irregular duration delta time ticks of a tuplet note.
In general, don't expect the MIDI file import option to work most of the time. It should work when the MIDI file is perfectly sequenced, if the internal timing is perfect and there are no delta-time errors, if the chords inside the MIDI file are relatively simple and all contain notes with equal durations and in general if the MIDI file IS RELATIVELY SIMPLE. Don't expect to be able to download thousands of MIDI files off the Internet and be able to just import them so you can edit them.
The MIDI file format was NOT intended for graphical purposes, so the algorithm that parses and translates the MIDI file contents and turns them into musical symbols is actually very complicated. One slight problem and the algorithm will abort.
If Virtual Composer aborts while trying to Import a MIDI file, you can try to edit the MIDI file with a MIDI editor such as MIDIGraphy and try to locate any bad delta-times. They are the right most column in MIDIGraphy's Event-List format when you view a MIDI file.
You could try to edit some bad delta times and see if Virtual Composer will allow you to import the file, but this is not a job for the meek. In general, if Virtual Composer cannot import the MIDI file, there's nothing I can do. Sorry.
You can also try the following to increase the possibility of Virtual Composer importing a MIDI file successfully:
CAUTION!! If you want the imported file to contain the original MIDI chord notes as they are to be found inside the MIDI file, set the appropriate options "Allow Chords..." and "Number of Chord Notes" in the "Edit->Preferences..." dialog. Otherwise only the chord heads will be imported.
Versions above and including 2.9 of Virtual Composer are scriptable. This means that you can perform most of the mundane and repetitive tasks automatically and in batch mode, such as playing, exporting, joining and mixing.
You can can view Virtual Composer's AppleScript dictionary, by running Script Editor and selecting "File->Open Dictionary...". Virtual Composer's AppleScript vocabulary, understands the following syntax:
Required Suite: Terms that every application should support
open: Open the specified object(s)
open alias -- list of objects to
open
print: Print the specified object(s)
print alias -- list of objects to
print
quit: Quit application
quit
run: Sent to an application when it is
double-clicked
run
Virtual Composer Suite: Suite Pertaining to Virtual Composer
play: Play a file (or list of files)
play file specification -- The file(s) to play
mix: Mix two AIFF files
mix file specification -- The files to mix
in file specification -- the file specification of the
mixed file
join: Join two AIFF files
join file specification -- The files to join
in file specification -- the file specification of the
joined file
export: Export document as MIDI, AIFF, abc or
TEXT
export file specification -- The file to export
in file specification -- the file specification of the
exported file
as type class -- the file type to export as
import: Import a MIDI file.
import file specification -- The MIDI file to
import.
Class application: The Virtual Composer
Application
Properties:
animation boolean -- Whether or not Virtual Composer should
do animation when playing
autoscroll boolean -- Whether or not Virtual Composer should
autoscroll pages when animating
arpeggios integer -- Mode of execution for arpeggiated chords
(16, 32)
ornaments integer -- Mode of execution for ornaments (32, xx) if
not 32, xx denotes Best Fit
resynchronization boolean -- Whether or not Virtual Composer
should apply the resynchronization algorithm when playing
repeats boolean -- Whether or not Virtual Composer should
do repeats when playing
subfolders boolean -- Whether or not Virtual Composer
should include subfolders when playing folders
sample rate integer -- AIFF file export sound rate in Hertz
(8000, 11025, 11127, 22050, 22255, 32000, 44100, 48000)
sample size small integer -- AIFF file export sample size
(8/16)
stereo boolean -- Whether or not the exported AIFF file is
stereo
channels a list of small integer -- The channel(s) to
activate
Virtual Composer also understands a subset of the Core Suite events:
Core Suite: Events Every Application Should Support
close: Close a file (or list of files)
close file specification -- the file(s) to close
set: Set an property's data
set property -- the property to set
to data -- the new value
"Property" above takes from the list of properties from the Virtual Composer Class Application.
There are many example scripts in the "Scripts" folder than automate many of the more mundane tasks and can help you understand Virtual Composer's syntax. Take a good look a them in particular look at script: "Produce Partita in full Stereo". This advanced script contains detailed calls to all scripting functions of the application.
If you create a script and it does not run as expected, you can email me and I will be glad to assist you in debugging it. The commonest mistakes in scripts however are forgetting the word "file/alias" before file specifications and incorrect pathnames.
Enjoy!!
This section is information for programmers only. You don't need to read it if you are not a programmer.
The entire Virtual Composer project (interface files excluded) is approximately 61,000 lines long. The source code consists of 120 independent units which make for around 1.9 Megabytes of CodeWarrior text. The whole thing (interface files included) compiles in about 10 minutes. Virtual Composer's pure object code is around 480K (68k) and 560K (PPC) and is the most compact code amongst all music sequencers that are out there. The project has taken 2 and a half years to reach its current state and it was started in 1998, while I was a research assistant at the Mathematics department of the University of Crete.
Versions prior to and including 2.9.4, were 68k and were created using THINK Pascal. From version 2.9.5 the application is FAT and was created using CodeWarrior. It will run natively on both 68k and PPC Macintoshes.
All pictures and PICTs were created using home-brew methods in conjunction with Thorsten Lemke's GraphicConverter.
Virtual Composer is one of the only two programs in existence that uses the QuickTime Music Architecture (the other one is BarFly by Phil Taylor) for full music productions using QuickTime's Musical Instruments. While there are other shareware programs that use QuickTime Musical Instruments, Virtual Composer is the only full fledged notator that uses QuickTime for its music. There are other notators (like Lime) that use the QuickTime Musical Instruments but in a very limited way and only if a MIDI keyboard is not connected externally. It is the only program in existence that can export in MusicXML in the Classic MacOS, and it's also the only program that honors playback in different temperaments.
Unofficially, the hardest parts of the program were: (in order of difficulty)
The idea for Virtual Composer came from the first professional program that did music on the 128K macintosh, MusicWorks by Jay Fenton. MusicWorks of course used the sound driver, which allowed a maximum of 4 parallel banks (channels). This limit has been broken quite effectively via QuickTime's Music Architecture and the current implementations of the QuickTime player allow for 32 simultaneous parallel banks.
Virtual Composer has been published in many Macintosh magazines, and has been included in their accompanying CDs. Some of these magazines were: MacWorld, MacAddict, MacLife (Japanese), MacPeople (Japanese), Rexy (Japanese) and others which I have lost track of.
Most of my customers are from Germany, England, France, Netherlands, Japan and Canada.
The source code for Virtual Composer deals with many advanced Mathematics issues as well. There are fast and efficient sections that deal with Number Theory, Geometry, Fourier Analysis, Cryptography, Statistics and Calculus.
Number Theory is used in the Statistics and Fourier modules. Geometry and Calculus is used in the Graphics modules, Cryptography in the resource validation modules which check the program's integrity on start, and Fourier analysis and Statistics in the corresponding modules.
If you are interested in seeing parts of the source code, email me and I can see what I can do. I can gladly send you segments of the source that deal with specific issues.
I enjoy getting email, so if you like what you hear and see in Virtual Composer, drop me a note and tell me about it. Even if you haven't registered or don't plan to register, you can email me with comments and suggestions about things you would like to see in future versions. I will be glad to answer any questions about the program's capabilities.
First, many thanks to Jay Fenton, Marc A. Canter and Mark S. Pierce, the makers of
MusicWorks for the idea of Virtual Composer. When the 128K Macintosh came out, I
enjoyed hours upon hours of music playing and composing with MusicWorks.
Thanks to Thomas Kiffe for letting me use his
excellent printing emulator MacGhostView.
Thanks to the makers of Finale (Coda Music) for allowing me to use their Petrucci
Font.
Many thanks to Phil Taylor for his valuable advice and help. Phil has created an
excellent abc music program, BarFly. Read more about it here. (BarFly, accepts the abc output of
Virtual Composer).
Many thanks to the entire comp.sys.mac.programmer.help group and especially to Michael
Kluev, Ian Ollmann, David Phillip Oster, Graham Cox and Meeroh Jurisic.
Many thanks to the people in the sci.math newsgroup for their help with the Fast
Fourier Transform goodies.
Thanks to Ken Pledger for solving one of the most annoying problems in the program.
Thanks to Keith Bartlett for testing the application's printing code.
Thanks to Chuck Kimball for testing the animation on a fast machine and pointing out
various bugs on previous versions.
Thanks to Neil Drake of Tamarack Technologies, LLC, for suggesting some smart ways of
avoiding unnecessary window switching while changing cursors.
Many thanks to professor Sterling Beckwith for suggesting some smarter ornament
algorithms and many other features which I haven't thought of, like the interval
searches his continuous and tireless support.
Kind thanks to Kevin Oliver of Aeon Music
Productions for his generous offer of the E-Motion Suite.
Kind thanks to Jean-Christophe
Levinson, for providing the Goldberg Variations, the Partita in E minor, the
Inventions in two voices and several other pieces. Jean-Christophe has become quite an
expert with this application. If you are extremely polite with him, you might consider
contacting him regarding specific questions. He probably knows the program better than
even I do by now.
Many thanks to Eric Grant and David
Phillip Oster for their help with AppleEvents. If Eric and Philip hadn't answered
several questions on scripting, it wouldn't be there now.
All manual pictures were created using Thorsten Lemke's excellent GraphicConverter.
Many thanks go to my friend and coworker Paris Pamfilos, assistant professor in the
department of Mathematics at the University of Crete. If Paris was not around the
program would be much slower and possibly very buggy. If you are doing any heavy-duty
geometry on the Macintosh try Paris's incredible program EucliDraw.
QuickTime FAQ for BarFly by Phil Taylor
As BarFly is becoming increasingly QuickTime-oriented, I thought I'd pass on some information which I've gleaned about Apple's multimedia software. All of this applies to the Macintosh platform, but may also apply to QuickTime on Win32 systems too.
The usual disclaimers apply - i.e. don't blame me if something horrid happens; it worked OK for me!
GETTING QUICKTIME
The download site for QT (Mac and PC) is here:
Current version is 4.1.1 (Ioannis: QuickTime is now at 7.x)
What you get when you download here is a net installer; this is not at all obvious until you start it up and click the install button - then it fires up your modem (if that's what you use) and logs in to Apple's site to download the appropriate bits for your installation. In some ways this is very efficient, as you only need to download the bits you actually need, but it's no good if you are going to install on a machine other than the one you are downloading to.
If that is the case you need to go here:
where you can download the entire installer in one chunk (7.2 Mb).
Note that QuickTime 4.1.1 only runs on Power Macs and Windows 95/98/2000/NT. If you have a 68K Mac you need version 4.0.3, which you can get from here: (8.4 Mb).
INSTALLING
The standard QT installation does not include QuickTime Musical Instruments, so if you are installing to use with BarFly you need to do either a custom or full install. (Entertainingly, if you do a standard install and then start BarFly, QT will put up a message telling you that there's a component missing, then fire up your modem and go fetch it.)
If you choose to do a custom install, the bits you need for BarFly are:
QuickTime essentials
QuickTime still image
QuickTime music
(Ioannis Note: To make sure Virtual Composer runs successfully with all options enabled see section Getting QuickTime above).
GETTING RID OF THE NAG SCREEN
You don't have to pay for QT pro to use it with BarFly, (or for anything except editing movies), but when you start up the movie player you get an annoying screen which prompts you to pay and register. There are two things you can do about this:
1. Get the latest version (nag screen only comes up once a week).
2. Put your machine's clock forward to 2010, start the QT Player, click on the 'Later' button in the nag screen, quit from QT Player and reset the clock back to today's date. Then you won't see that screen again for ten years.
IF YOU HAVE PAID FOR QT PRO
You may be a little disappointed at first, as the extra features you get are not at all obvious. All apply to the QuickTime Player application, and allow you to edit, export and import movies in various ways.
There are lots of (apparently) undocumented features to be discovered. (Try all the menus while holding down combinations of ctrl-option-shift-cmd)
For musicians here is the number one all time QT hack:
Open up a music movie (created by Virtual Composer) with QuickTime Player. (If you don't have the Pro version, you can't do this, but surprise, you can do it with the old Movie Player!) Do a Get Info (from the movie menu). In the information box, set the left popup to Music Track, and the right one to Instruments. At this point, double-clicking on an instrument name will bring up the QT Instrument selector dialog (same as in Virtual Composer) so you can change the instruments. However, if you hold down the option key while double-clicking you will discover a new edit button in the dialog. Clicking on this puts you into the concealed atomic instrument editor (click on the black square in the middle to access the 'advanced' features). This will let you twiddle all of the QuickTime synthesizer's knobs, and create entirely new instruments for your listening pleasure. Absolutely miraculous!
If anybody discovers any other QT hacks, I'd be delighted to hear from you.
Phil Taylor
© Ioannis Galidakis